User Guide
Artistic AddressBook (ArB) is a desktop application for freelance artists, meant to help with efficiently managing client and project information. It is optimized for use via keyboard commands that you can enter quickly and easily while displaying your data in an appealing and well-organised visual format so you can always find what you need. If you can type fast, ArB can get your client and project management tasks done faster than other applications that only use the mouse.
Table of Contents
Quick start
-
Ensure you have Java
11or above installed in your Computer. -
Download the latest
arb.jarfrom here. -
Copy the file into a new folder. For example, you can create a new folder in your desktop folder called
ArBand place the file there. - Open a command terminal (Windows, Mac, Linux).
Use thecdcommand to navigate to the folder you placed the jar file in. If you followed the previous example, you can typecd Desktop/ArBinto the command terminal.
Then use thejava -jar arb.jarcommand to run the application.
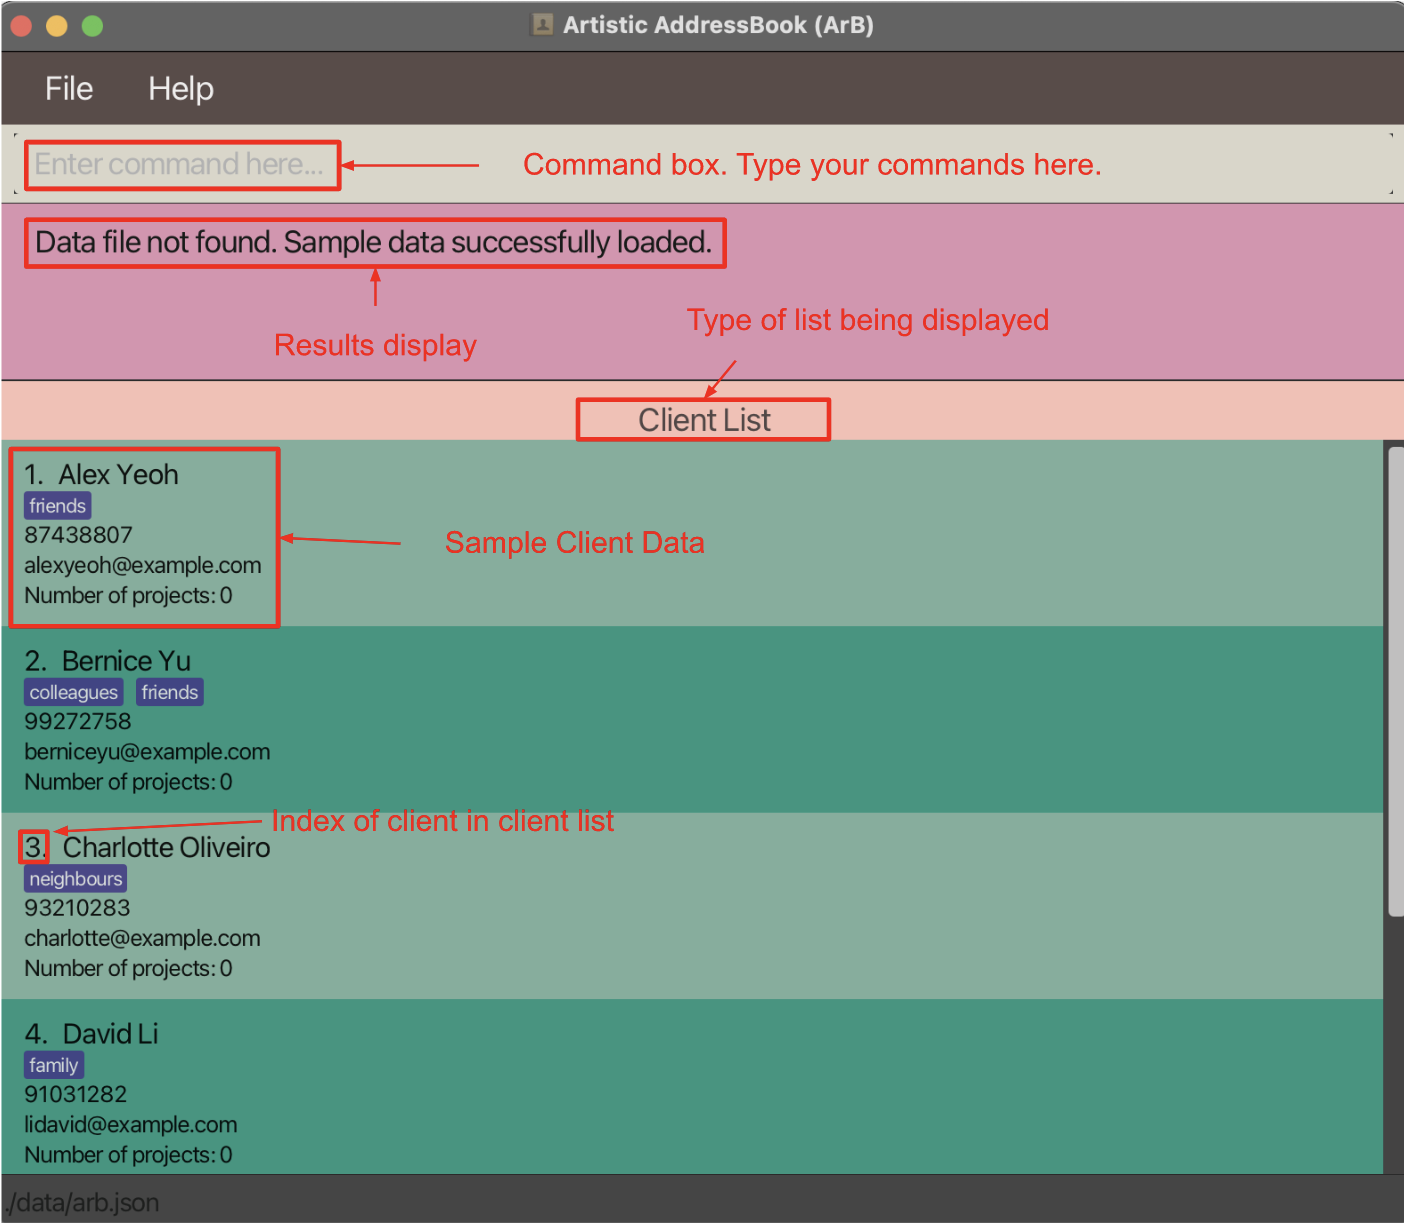
A window similar to the below should appear in a few seconds. The application will contain some sample data if being opened for the first time.

Below is the same window annotated to show what each part is for.
-
Type a command in the command box and press Enter to execute it. E.g. typing
helpand pressing Enter will open the help window.
Some example commands you can try:-
list-client: Lists all clients. -
list-project: Lists all projects. -
add-client name/John Doe phone/98765432 email/johnd@example.com: Adds a client namedJohn Doeto the ArB. -
delete-client 3: Deletes the 3rd client in the currently visible client list. -
exit: Exits the application.
-
- Refer to the Features below for details of each command.
Command format
-
All command formats given in this user guide come in the form of
command-word additional-details.
Example:

-
Additional details come in the form of
prefix/detail, wheredetailis in UPPER_CASE and is to be supplied by the user, andprefixindicates what detail is being provided.
Example:

-
Additional details in square brackets are optional. Additional details in angle brackets are required and must be supplied by the user.
Example:

-
Additional details with * after them can be used multiple times, including zero times.
Example:

In the example above,[tag/TAG]*can be used as(i.e. 0 times),tag/friend,tag/friend tag/familyetc. -
Some command formats require an index to be provided. This is the index of the object of interest in the currently visible list. The index must be a positive integer 1, 2, 3, …
Example:
-
All command words are case-insensitive.
-
Additional notes:
-
Additional details can be given in any order.
Example: If the command specifiesname/NAME phone/PHONE_NUMBER,phone/PHONE_NUMBER name/NAMEis also acceptable. -
If some detail is expected only once in the command, but it has been specified multiple times, only the last occurrence will be taken.
Example: If you specifyphone/12341234 phone/56785678, onlyphone/56785678will be taken. -
Extraneous details for commands that do not take in any (such as
help) will be ignored.
Example: If the command specifieshelp 123, it will be interpreted ashelp. -
Extraneous details for commands that take in only one (such as
delete-client) will be ignored.
Example: If the command specifiesdelete-client 1 abcit will be interpreted asdelete-client 1. -
Most command words and prefixes have shorter short forms that can be used the same way, so that you can complete the same tasks faster once you’re used to the application. For example,
list-projecthas the short formlpandname/has the short formn/.
Example: Enteringlist-projectis the same as enteringlpand enteringadd-project name/John Doeis the same as enteringadd-project n/John Doe.
-
Prefixes
| Prefix | Short form | Description |
|---|---|---|
name/ |
n/ |
Name of client/project |
email/ |
e/ |
Email address |
phone/ |
p/ |
Phone number |
deadline/ |
d/ |
Deadline for project |
price/ |
pr/ |
Price of project |
tag/ |
t/ |
Tag |
client/ |
c/ |
Keywords to search for client to link to a project |
option/ |
o/ |
Option to sort projects with |
start/ |
s/ |
Start of timeframe for finding projects |
end/ |
e/ |
End of timeframe for finding projects |
status/ |
st/ |
Status for finding projects |
Command summary
| Action | Command Word | Short Form | Format, Examples |
|---|---|---|---|
| Listing all clients | list-client |
lc |
list-client |
| Adding a client | add-client |
ac |
add-client <name/NAME> [email/EMAIL] [phone/PHONE_NUMBER] [tag/TAG]* e.g., add-client name/Bob phone/12345678 email/bob@gmail.com tag/friend
|
| Editing a client | edit-client |
ec |
edit-client <index> [name/NAME] [email/EMAIL] [phone/PHONE_NUMBER] [tag/TAG]* e.g., edit-client 3 name/Alice Risa phone/1234 tag/classmate
|
| Deleting a client | delete-client |
dc |
delete-client <index>e.g., delete-client 1
|
| Clearing the client list | clear-client |
cc |
clear-client |
| Finding clients | find-client |
fc |
find-client [name/NAME]* [tag/TAG]* e.g., find-client name/bob name/alice tag/friend
|
| Sorting clients | sort-client |
sc |
sort-client |
| Listing all projects | list-project |
lp |
list-project |
| Adding a project | add-project |
ap |
add-project <name/NAME> [deadline/DEADLINE] [price/PRICE] [client/CLIENT]* [tag/TAG]* e.g., add-project name/Background Commission deadline/2023-05-05 price/400 client/alice tag/painting
|
| Editing a project | edit-project |
ep |
edit-project <index> [name/NAME] [deadline/DEADLINE] [price/PRICE] [client/CLIENT]* [tag/TAG]* e.g., edit-project 2 name/The Starry Night
|
| Deleting a project | delete-project |
dp |
delete-project <index>e.g., delete-project 1
|
| Marking a project as done | mark |
mp |
mark <index> e.g., mark 3
|
| Marking a project as not done | unmark |
up |
unmark <index> e.g., unmark 3
|
| Clearing the project list | clear-project |
cp |
clear-project |
| Finding projects | find-project |
fp |
find-project [name/NAME]* [start/START_OF_TIMEFRAME] [end/END_OF_TIMEFRAME] [status/STATUS] [tag/TAG]* [client/CLIENT]* e.g., find-project name/sky start/yesterday tag/painting
|
| Sorting projects | sort-project |
sp |
sort-project <option/OPTION> e.g., sort-project option/name
|
| Listing all tags | list-tag |
lt |
list-tag |
| Viewing help | help |
- | help |
| Exiting the program | exit |
- | exit |
Features
Client commands
The available client-related commands are:
- Listing all clients
- Adding a client
- Editing a client
- Deleting a client
- Clearing the client list
- Finding clients
- Sorting clients
Listing all clients
Format: list-client
Short form: lc
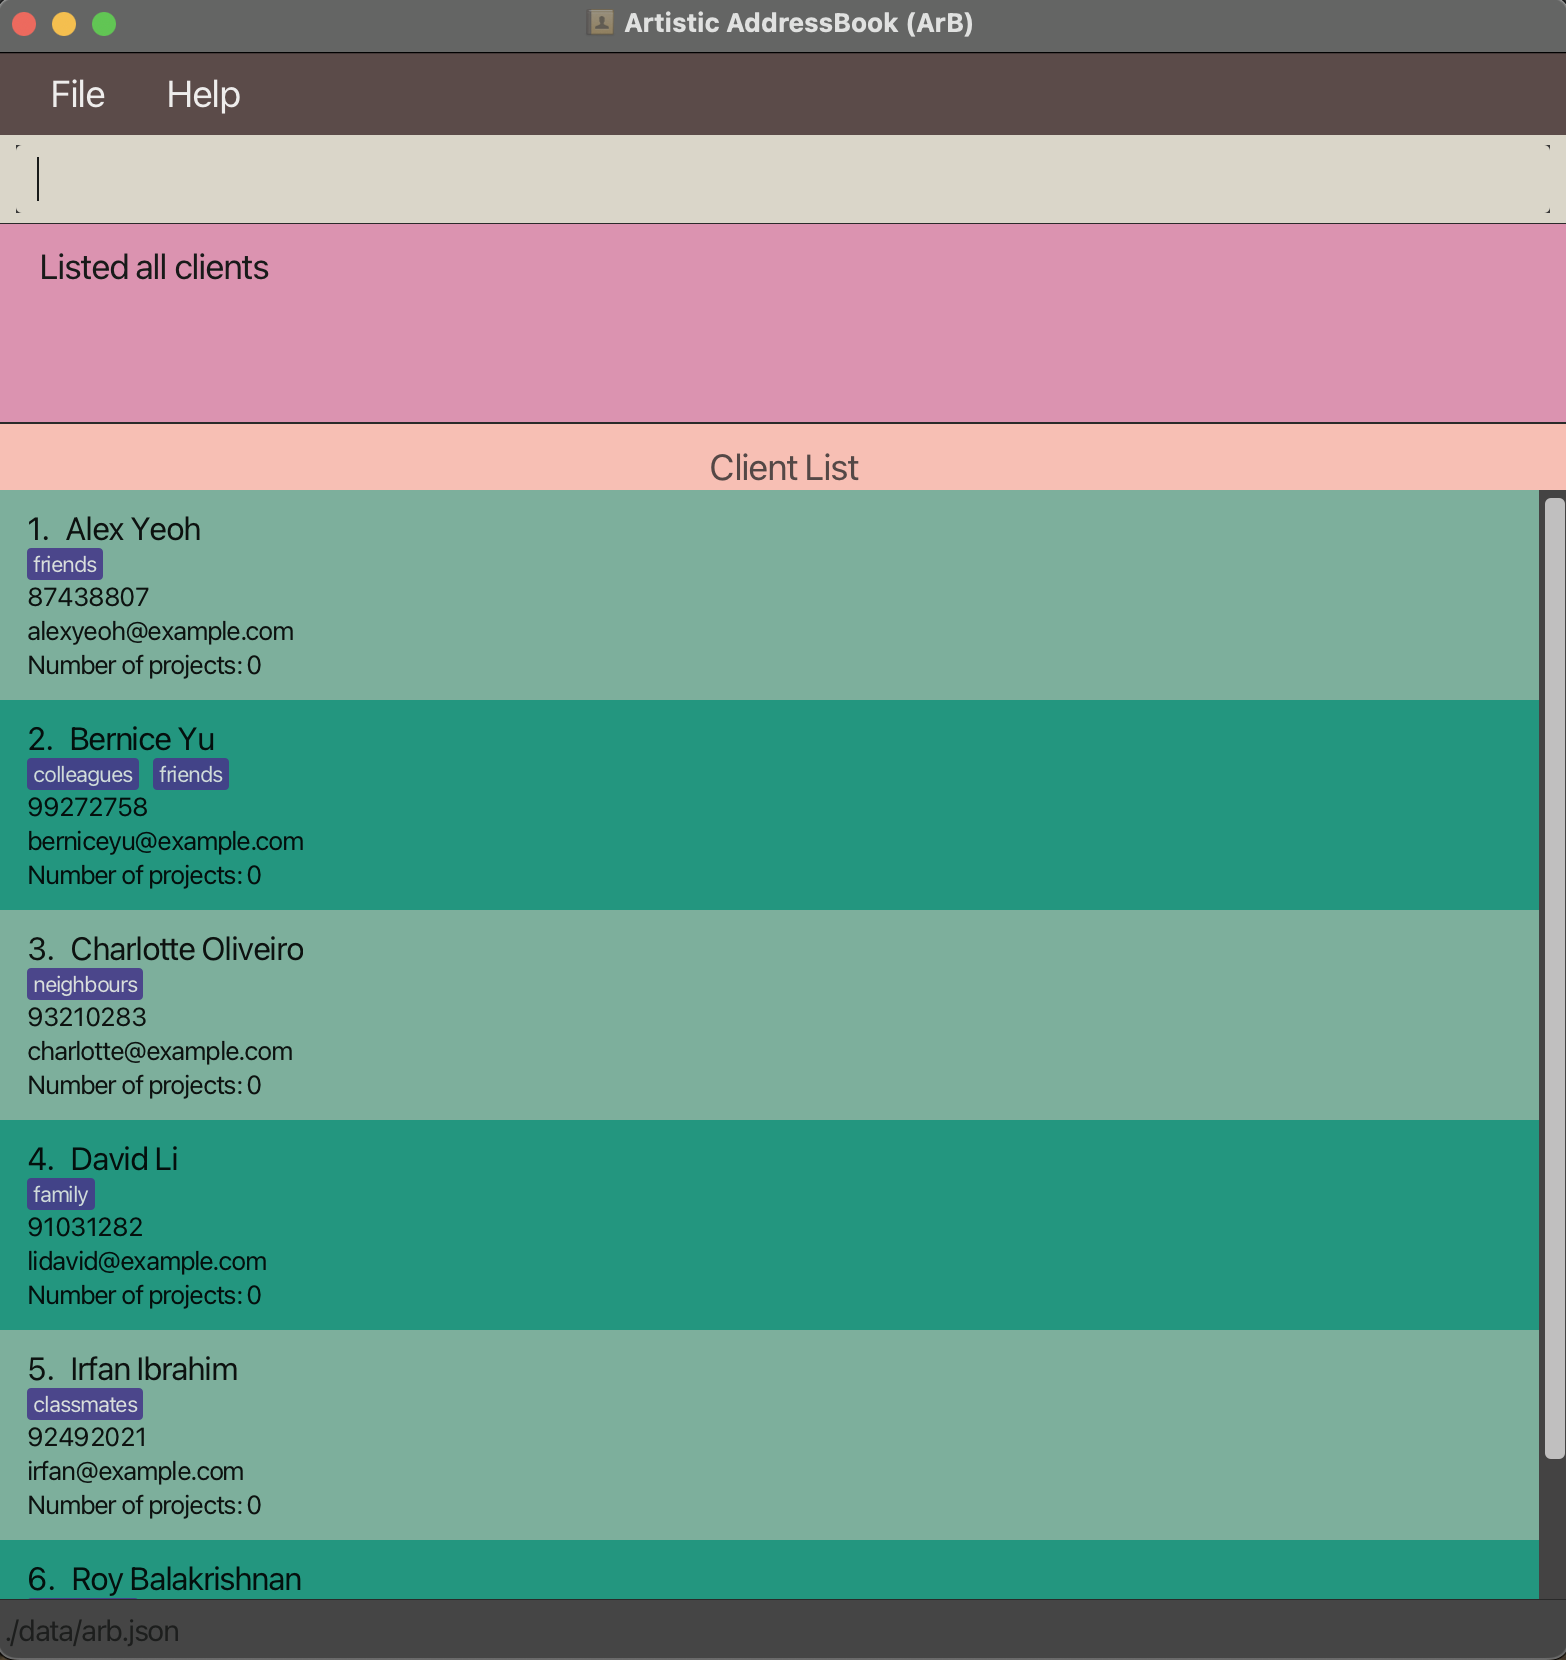
Lists out all clients and shows the client list.
Adding a client
Format: add-client <name/NAME> [email/EMAIL] [phone/PHONE_NUMBER] [tag/TAG]*
Short form: ac <n/NAME> [e/EMAIL] [p/PHONE_NUMBER] [t/TAG]*
Adds a client to the application with the supplied details. The details that can be supplied are the name, email address and phone number of the client, along with any number of tags to be added.
Only the name of the client is compulsory. Client names are case-sensitive, so alice and Alice are recognised as different names.
The email address and phone number must be in a valid format. E.g. XXX@gmail.com or XXX@yahoo.com for emails and 12345678 for phone numbers.
Note:
- Each tag to be added needs a separate
tag/TAGprefix. - Empty prefixes for optional details will be ignored.
Examples:
-
add-client name/Bob phone/12345678 email/bob@gmail.com tag/friend tag/defaultadds a client by the name ofBobwith phone number12345678, email addressbob@gmail.comand is taggedfriendanddefault. -
add-client name/Aliceadds a client by the name ofAlice. -
ac n/Clary p/87654321 e/clary@gmail.comadds a client by the name ofClarywith phone number87654321and email addressclary@gmail.com.
Editing a client
Format: edit-client <index> [name/NAME] [email/EMAIL] [phone/PHONE_NUMBER] [tag/TAG]*
Short form: ec <index> [n/NAME] [e/EMAIL] [p/PHONE_NUMBER] [t/TAG]
Edits the client at the given index of the currently visible client list, changing only the given details. Any prefixes that are provided but left empty will delete the corresponding detail of the client (apart from the name).
Details that can be changed:
- Name
- Email address
- Phone number
- Tags
Note:
- Provided details will overwrite existing ones entirely. E.g.
edit-client <index> tag/Friendwill change the client displayed at<index>to only have the tagFriend. - Using an empty
tag/prefix removes all tags of the client. This cannot be used with any non-emptytag/prefixes. E.g.edit-client 1 tag/ tag/friendis not valid. - At least one detail to edit must be provided.
- If used when a subset of clients is visible (e.g. due to a previous
find-clientcommand), the index provided is based on the currently displayed subset only. - A client list needs to be shown for this command to be executed successfully.
Examples:
-
edit-client 1 email/new@email.comedits the email address of the 1st displayed client to benew@email.com. -
edit-client 3 name/Alice Risa phone/1234 tag/edits the name of the 3rd displayed client toAlice Risaand phone number to1234. Removes any tags. -
ec 1 p/removes the phone number of the 1st displayed client.
Deleting a client
Format: delete-client <index>
Short form: dc <index>
Deletes the client at the specified index of the currently visible client list.
Note:
- The index refers to the index number shown in the displayed client list.
- The index must be a positive integer 1, 2, 3, …
- If used when a subset of clients is visible (e.g. due to a previous
find-clientcommand), the index provided is based on the currently displayed subset only. - A client list needs to be shown for this command to be executed successfully.
Examples:
-
list-clientfollowed bydelete-client 1deletes the first client in the list (if there is one). -
dc 3deletes the third client in the currently visible client list (if there is one).
Clearing the client list
Format: clear-client
Short form: cc
Deletes all clients in the client list.
Note:
- A client list needs to be shown for this command to be executed successfully.
Finding clients
Format: find-client [name/NAME]* [tag/tag]*
Short form: fc [n/NAME] [t/TAG]*
Finds a client based on the details provided. Details that can be supplied are the names and tags.
Note:
- The matching with supplied names and tags are case-insensitive. E.g.
name/alicewill find bothaliceandAlice. - Names and tags can either be separated by spaces or prefixes. E.g.
name/alice bobis treated the same asname/alice name/bob. - Invalid names and tags will be ignored. E.g.
name/alice name/!!! name/is treated the same asname/alice.
![]() Can’t find what you’re looking for? You can find some tips in the FAQ!
Can’t find what you’re looking for? You can find some tips in the FAQ!
Examples:
-
find-client name/bob tag/friendfinds any client whose name contains the wordboband is tagged withfriend. -
find-client name/bob name/alice tag/friend tag/husbandfinds any client whose name contains eitherboboralice, and is tagged with eitherfriendorhusband. -
fc n/alice charliefinds any client whose name contains eitheraliceorcharlie.
Sorting clients
Format: sort-client
Short form: sc
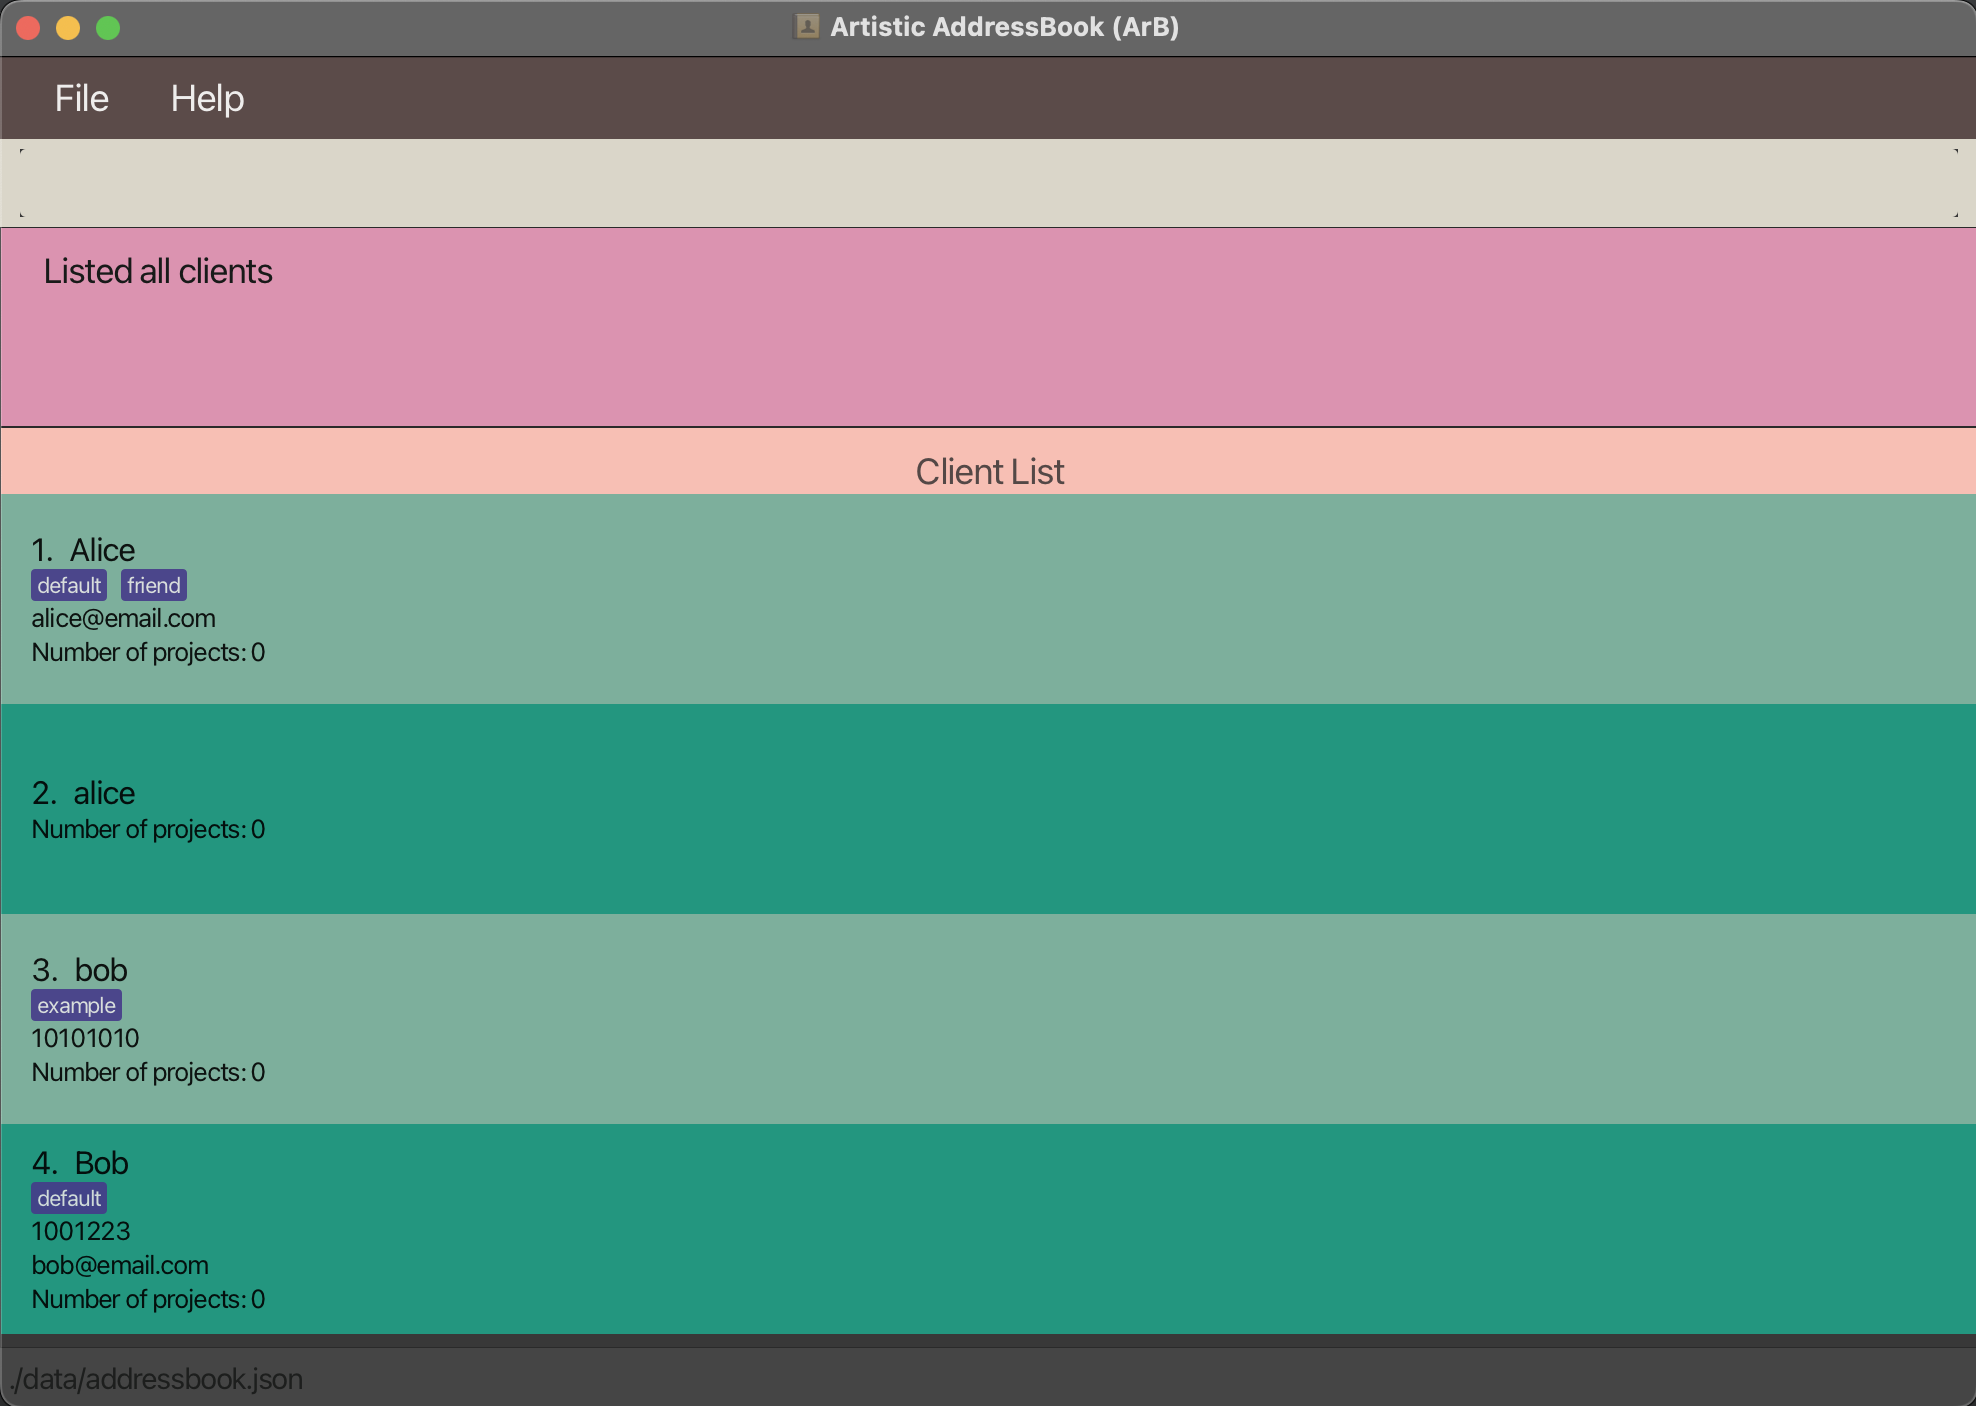
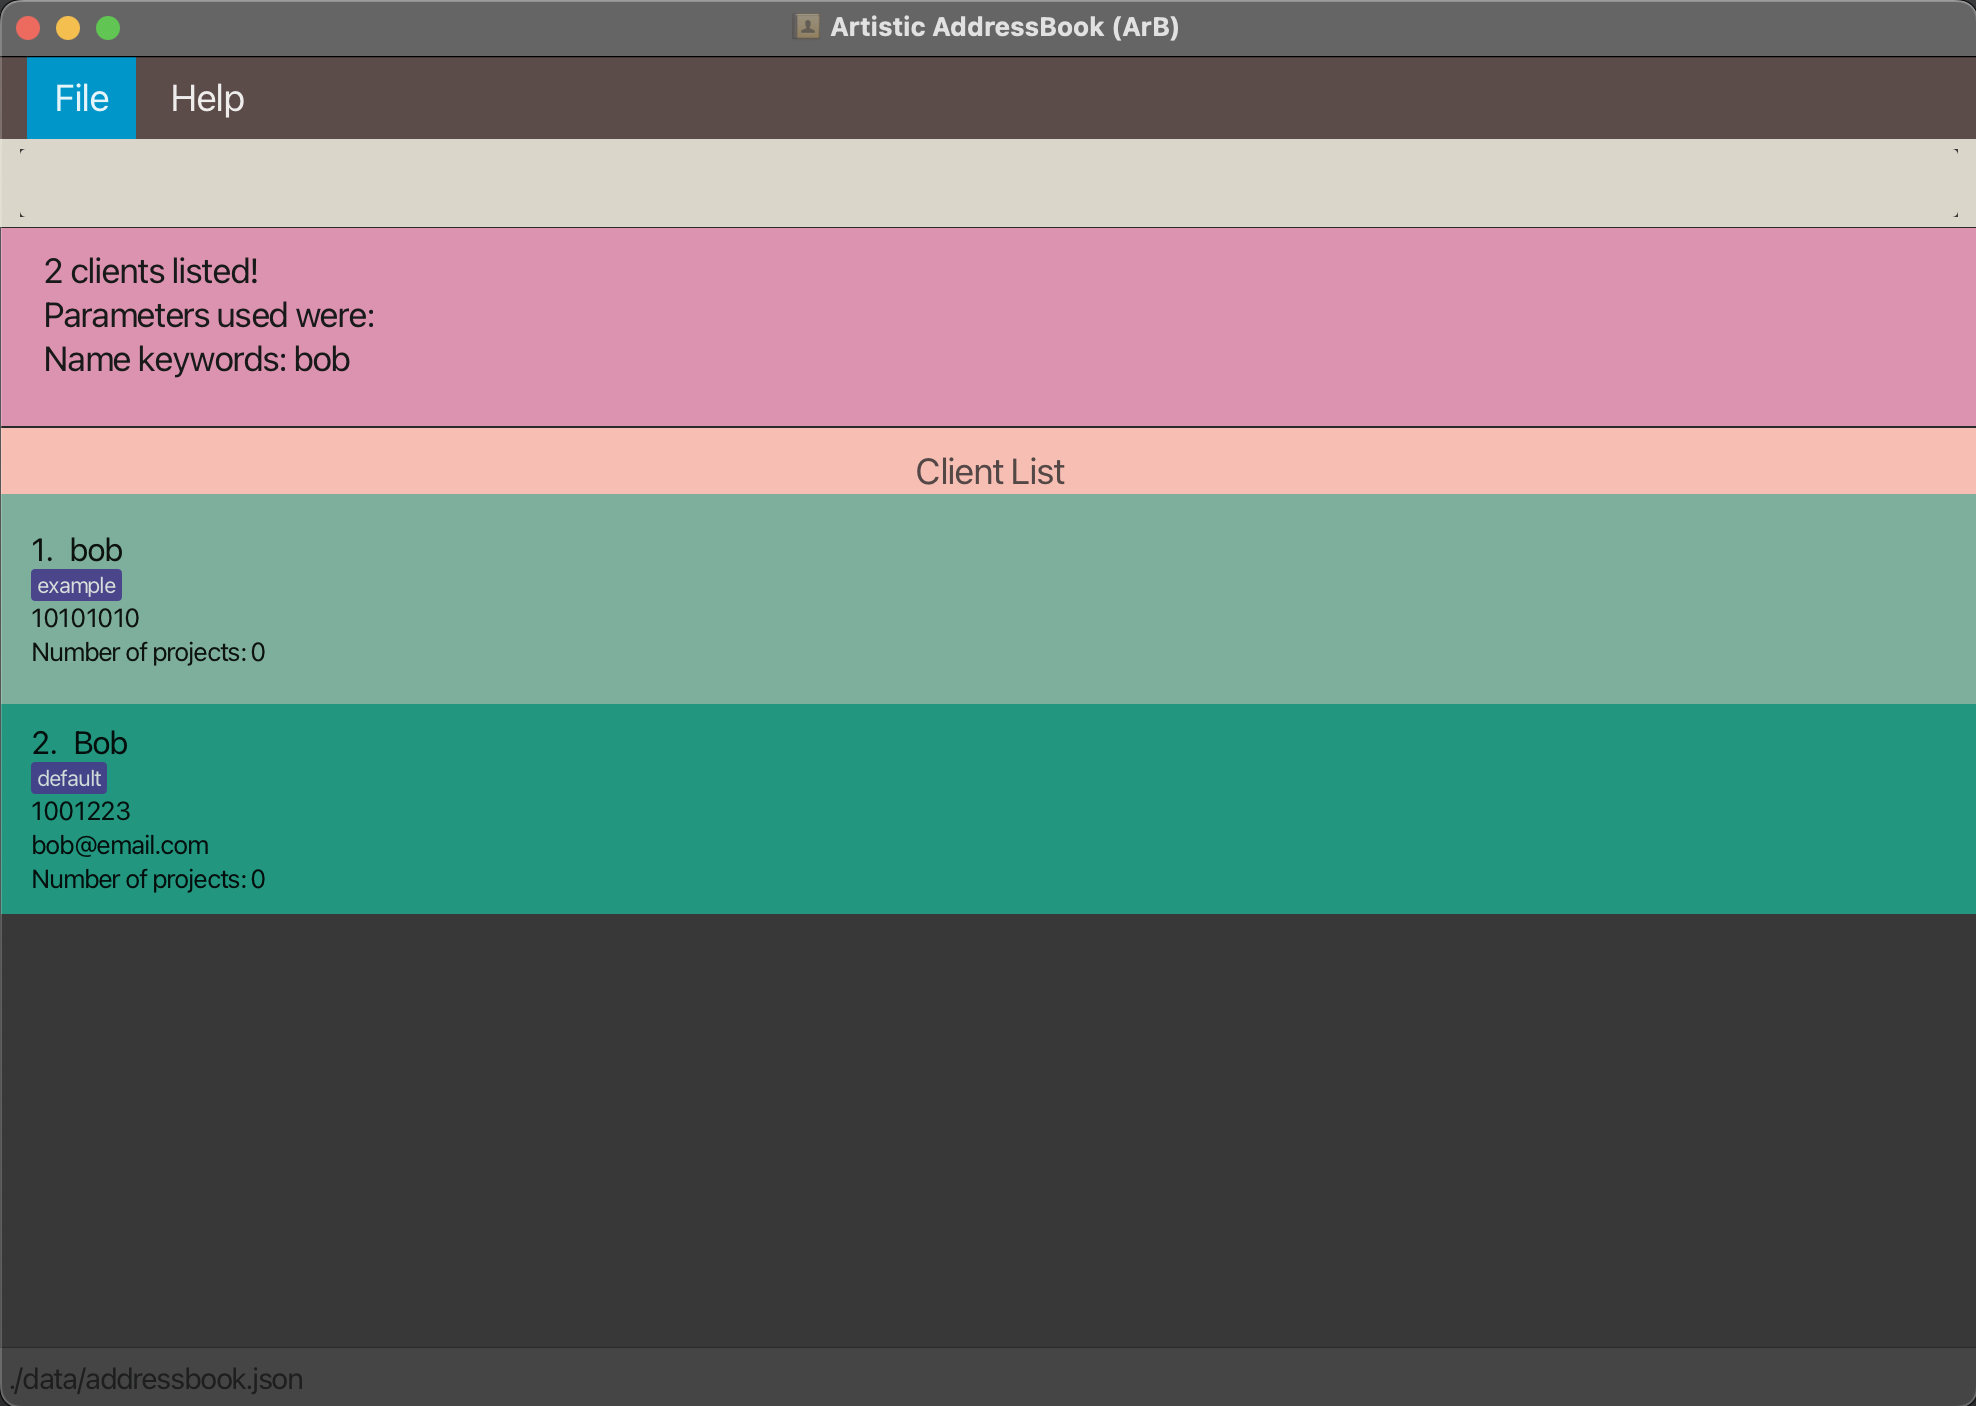
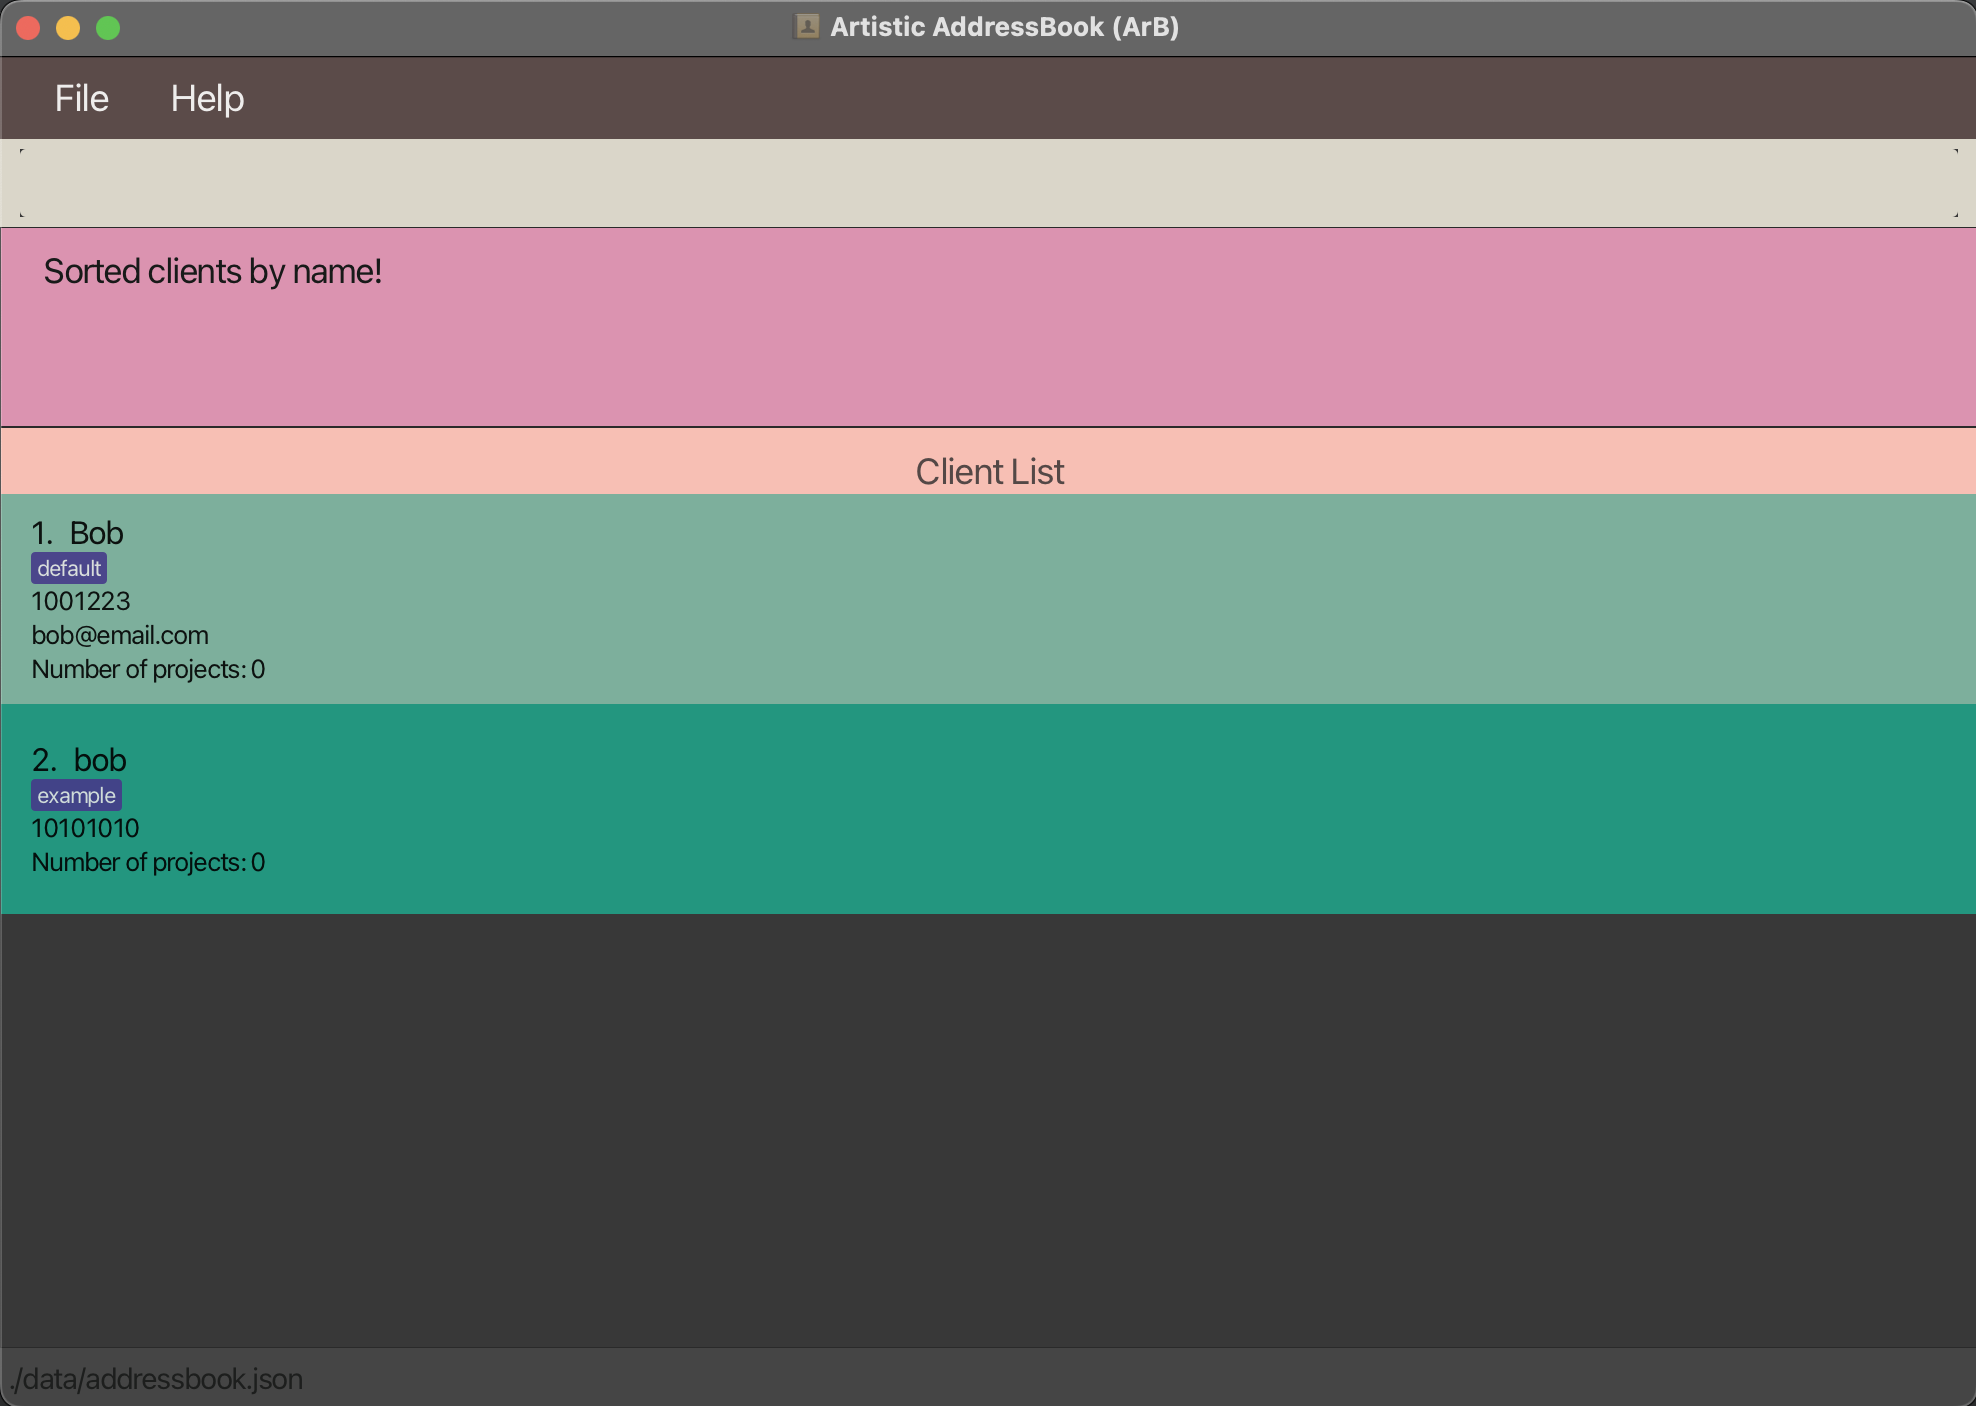
Sorts the currently visible clients by name in ascending order.
Example:
Original List
Run find-client name/bob
Run sort-client
Project commands
The available project-related commands are:
- Listing all projects
- Adding a project
- Editing a project
- Deleting a project
- Marking a project as done
- Marking a project as not done
- Clearing the project list
- Finding projects
- Sorting projects
- Linking a project to a client
Listing all projects
Format: list-project
Short form: lp
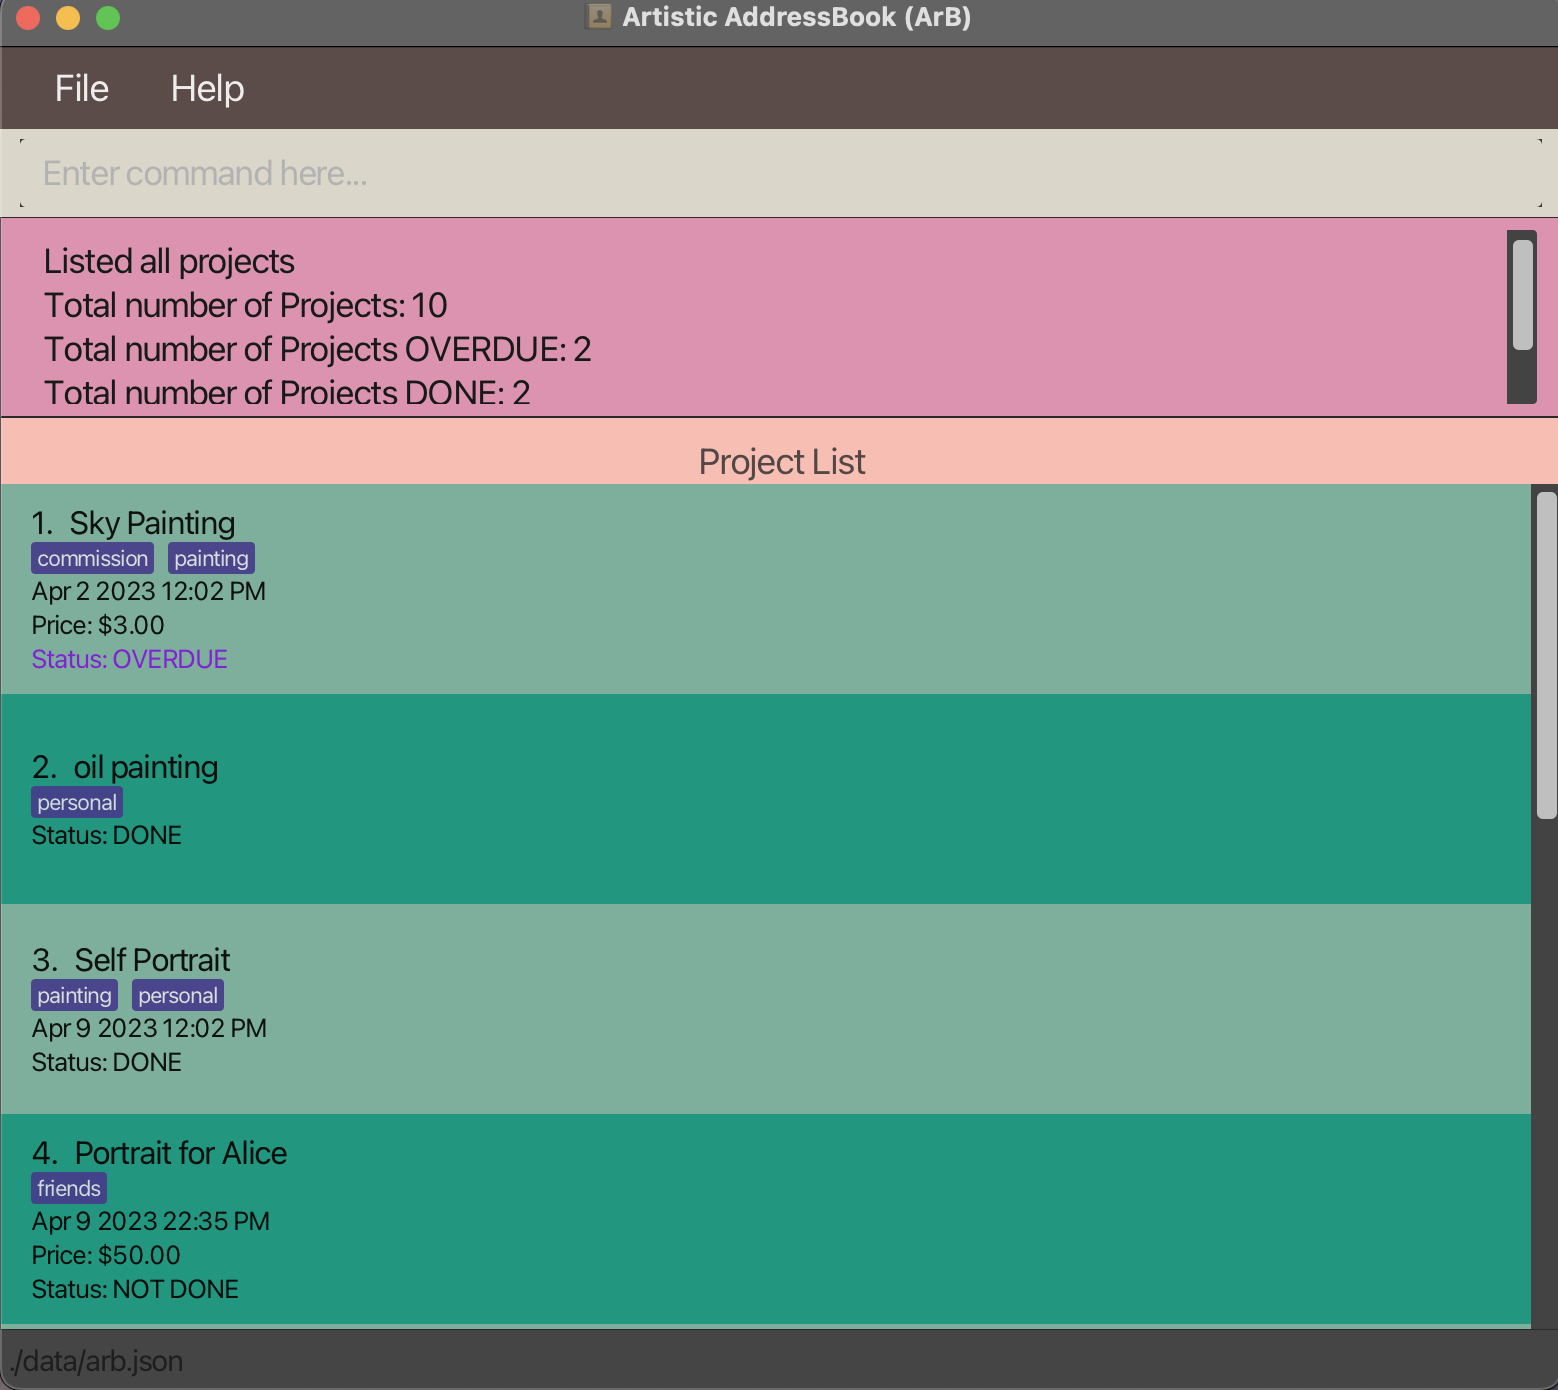
Lists out all projects and shows the project list. A summary of how many OVERDUE, DONE, and NOT DONE projects is also displayed. Note that an OVERDUE project is also considered as a NOT DONE project.
Adding a project
Format: add-project <name/NAME> [deadline/DEADLINE] [price/PRICE] [client/CLIENT]* [tag/TAG]*
Short form: ap <n/NAME> [d/DEADLINE] [pr/PRICE] [c/CLIENT]* [t/TAG]*
Adds a project to the application with the supplied details. The details that can be supplied are the name, deadline, price, tags and linked client of the project.
Only the name of the project is compulsory. Project names are case-sensitive, so oil painting and Oil Painting are recognised as different names.
Deadlines can be in natural language, e.g. tomorrow or 3pm next week. Otherwise, it must be in a recognisable format HH:MM DD-MM-YYYY or DD-MM-YYYY, e.g. 3pm 2023-03-03 or 2023-05-05.
Price must be a positive number given in 0 or 2 decimal places, e.g. 7 or 5.08.
Clients: Linking a project to a client means the project is for a certain client. You might do this if a specific client commissions a project.
The project can be linked to a client by specifying individual keywords that are part of the client’s name in the command after the client/ prefix. If any such details are mentioned, the application will enter link mode. Further steps can be found here.
Note:
- Each tag to be added needs a separate
tag/TAGprefix. - Client name keywords can be separated by either spaces or prefixes. E.g.
client/alice wheeleris treated the same asclient/alice client/wheeler. - Invalid client name keywords will be ignored. E.g.
client/alice client/!!! client/is treated the same asclient/alice. - Empty prefixes for optional details will be ignored.
Examples:
-
add-project name/Background Commission deadline/2023-05-05 price/500 tag/painting client/alice client/wheeleradds a project with the nameBackground Commision, a deadline of5th May 2023, a price of$500, and is taggedpainting. It also links this project to a client whose name contains any of the keywordsaliceorwheeler(if such a client exists). -
add-project name/Oil Paintingadds a project with the nameOil Painting. -
ap n/Sky Painting d/tomorrowadds a project with the nameSky Paintingand a deadline oftomorrow.
Editing a project
Format: edit-project <index> [name/NAME] [deadline/DEADLINE] [price/PRICE] [client/CLIENT]* [tag/TAG]*
Short form: ep <index> [n/NAME] [d/DEADLINE] [pr/PRICE] [c/CLIENT]* [t/TAG]*
Edits the project at the given index of the currently visible client list, changing only the given details. Any prefixes that are provided but left empty will delete the corresponding detail of the project (apart from the name).
Details that can be changed:
- Name
- Deadline
- Price
- Tags
- Linked client
Note:
- Provided details will overwrite existing ones entirely. E.g.
edit-project <index> tag/Friendwill change the project displayed at<index>to only have the tagFriend. - Using an empty
tag/prefix removes all tags of the project. This cannot be used with any non-emptytag/prefixes. E.g.edit-project 1 tag/ tag/paintingis not valid. - Using an empty
client/prefix removes the linked client of the project. This cannot be used with any non-emptyclient/prefixes. E.g.edit-project 1 client/ client/aliceis not valid. - Client name keywords can be separated by either spaces or prefixes. E.g.
client/alice bobis treated the same asclient/alice client/bob. - Invalid client name keywords will be ignored. E.g.
client/!!! client/aliceis treated the same asclient/alice. - At least one detail to edit must be provided.
- If used when a subset of projects is visible (e.g. due to a previous
find-projectcommand), the index provided is based on the currently displayed subset only. - A project list must be shown for this command to be executed successfully.
The steps to link to a client can be found here.
Example:
-
edit-project 2 name/The Starry Night tag/edits the name of the 2nd project in the list to beThe Starry Nightand removes all tags. -
edit-project 2 client/alicelinks the 2nd project in the list to a client whose name contains the keywordalice(if such a client exists). -
ep 2 n/Sky Painting pr/500edits the name of the 2nd project in the list to beSky Paintingand changes its price to$500.
Deleting a project
Format: delete-project <index>
Short form: dp <index>
Deletes the project at the specified index of the currently visible project list.
Note:
- The index refers to the index number shown in the displayed project list.
- The index must be a positive integer 1, 2, 3, …
- If used when a subset of projects is visible (e.g. due to a previous
find-projectcommand), the index provided is based on the currently displayed subset only. - A project list needs to be shown for this command to be executed successfully.
Example:
-
list-projectfollowed bydelete-project 1deletes the first project in the list (if there is one). -
dp 3deletes the third project in the currently visible project list (if there is one).
Marking a project as done
Format: mark <index>
Short form: mp <index>
Marks the project at the specified index of the currently visible project list as done.
Notes:
- The index refers to the index number shown in the displayed list of projects.
- The index must be a positive integer 1, 2, 3, …
- If used when a subset of projects is visible (e.g. due to a previous
find-projectcommand), the index provided is based on the currently displayed subset only. - A project list needs to be shown for this command to be executed successfully.
Examples:
-
list-projectfollowed bymark 2marks the 2nd project in the list of projects (if there is one) as done. -
mp 1marks the 1st project in the currently visible project list (if there is one) as done.
Marking a project as not done
Format: unmark <index>
Short form: up <index>
“Un-marks” the project at the specified index of the currently visible project list, indicating that it is not done.
Notes:
- The index refers to the index number shown in the displayed list of projects.
- The index must be a positive integer 1, 2, 3, …
- If used when a subset of projects is visible (e.g. due to a previous
find-projectcommand), the index provided is based on the currently displayed subset only. - A project list needs to be shown for this command to be executed successfully.
Examples:
-
list-projectfollowed byunmark 2indicates that the 2nd project in the list of projects (if there is one) is not done. -
up 1indicates that the the 1st project in the currently visible project list (if there is one) is not done.
Clearing the project list
Format: clear-project
Short form: cp
Deletes all projects in the project list.
Note:
- A project list needs to be shown for this command to be executed successfully.
Finding projects
Format: find-project [name/NAME]* [start/START_OF_TIMEFRAME] [end/END_OF_TIMEFRAME] [status/STATUS] [tag/TAG]* [client/CLIENT]*
Short form: fp [n/NAME]* [s/START_OF_TIMEFRAME] [e/END_OF_TIMEFRAME] [st/STATUS] [t/TAG]* [c/CLIENT]*
Finds a project based on details provided. Details that can be supplied are the name, the start and end of the timeframe the deadline of the project should fall into, tags, the client the project is linked to, and the status of the project.
Note:
- The matching with supplied names and tags are case-insensitive. E.g.
name/skywill find bothskyandSky. - Project names, tags and linked client names can be separated by either spaces or prefixes. E.g.
name/sky paintingis treated the same asname/sky name/painting. - Invalid project names, tags and linked client names will be ignored. E.g.
name/sky name/!!! name/is treated the same asname/sky. - Status must be specified as either
not done/ndordone/d. Overdue projects are included in “not done”. - At least one valid parameter must be provided.
![]() Can’t find what you’re looking for? You can find some tips in the FAQ!
Can’t find what you’re looking for? You can find some tips in the FAQ!
Examples:
-
find-project name/sculpture client/alicefinds any project with a name that contains the keywordsculptureand is linked to a client whose name contains the keywordalice. -
find-project tag/personal start/yesterday end/tomorrowfinds any project that is taggedpersonal, and has a deadline that falls between yesterday and tomorrow. -
fp st/ndfinds any project that is not done, including overdue ones.
Sorting projects
Format: sort-project <option/OPTION>
Short form: sp <o/OPTION>
Sorts all currently visible projects in ascending order by the specified option. The below options are accepted:
- Name (Must be specified as either
nameorn) - Deadline (Must be specified as either
deadlineord) - Price (Must be specified as either
priceorpr)
Note:
- Option matching is case-insensitive. E.g.
option/NAMEandoption/Nameis treated the same asoption/name.
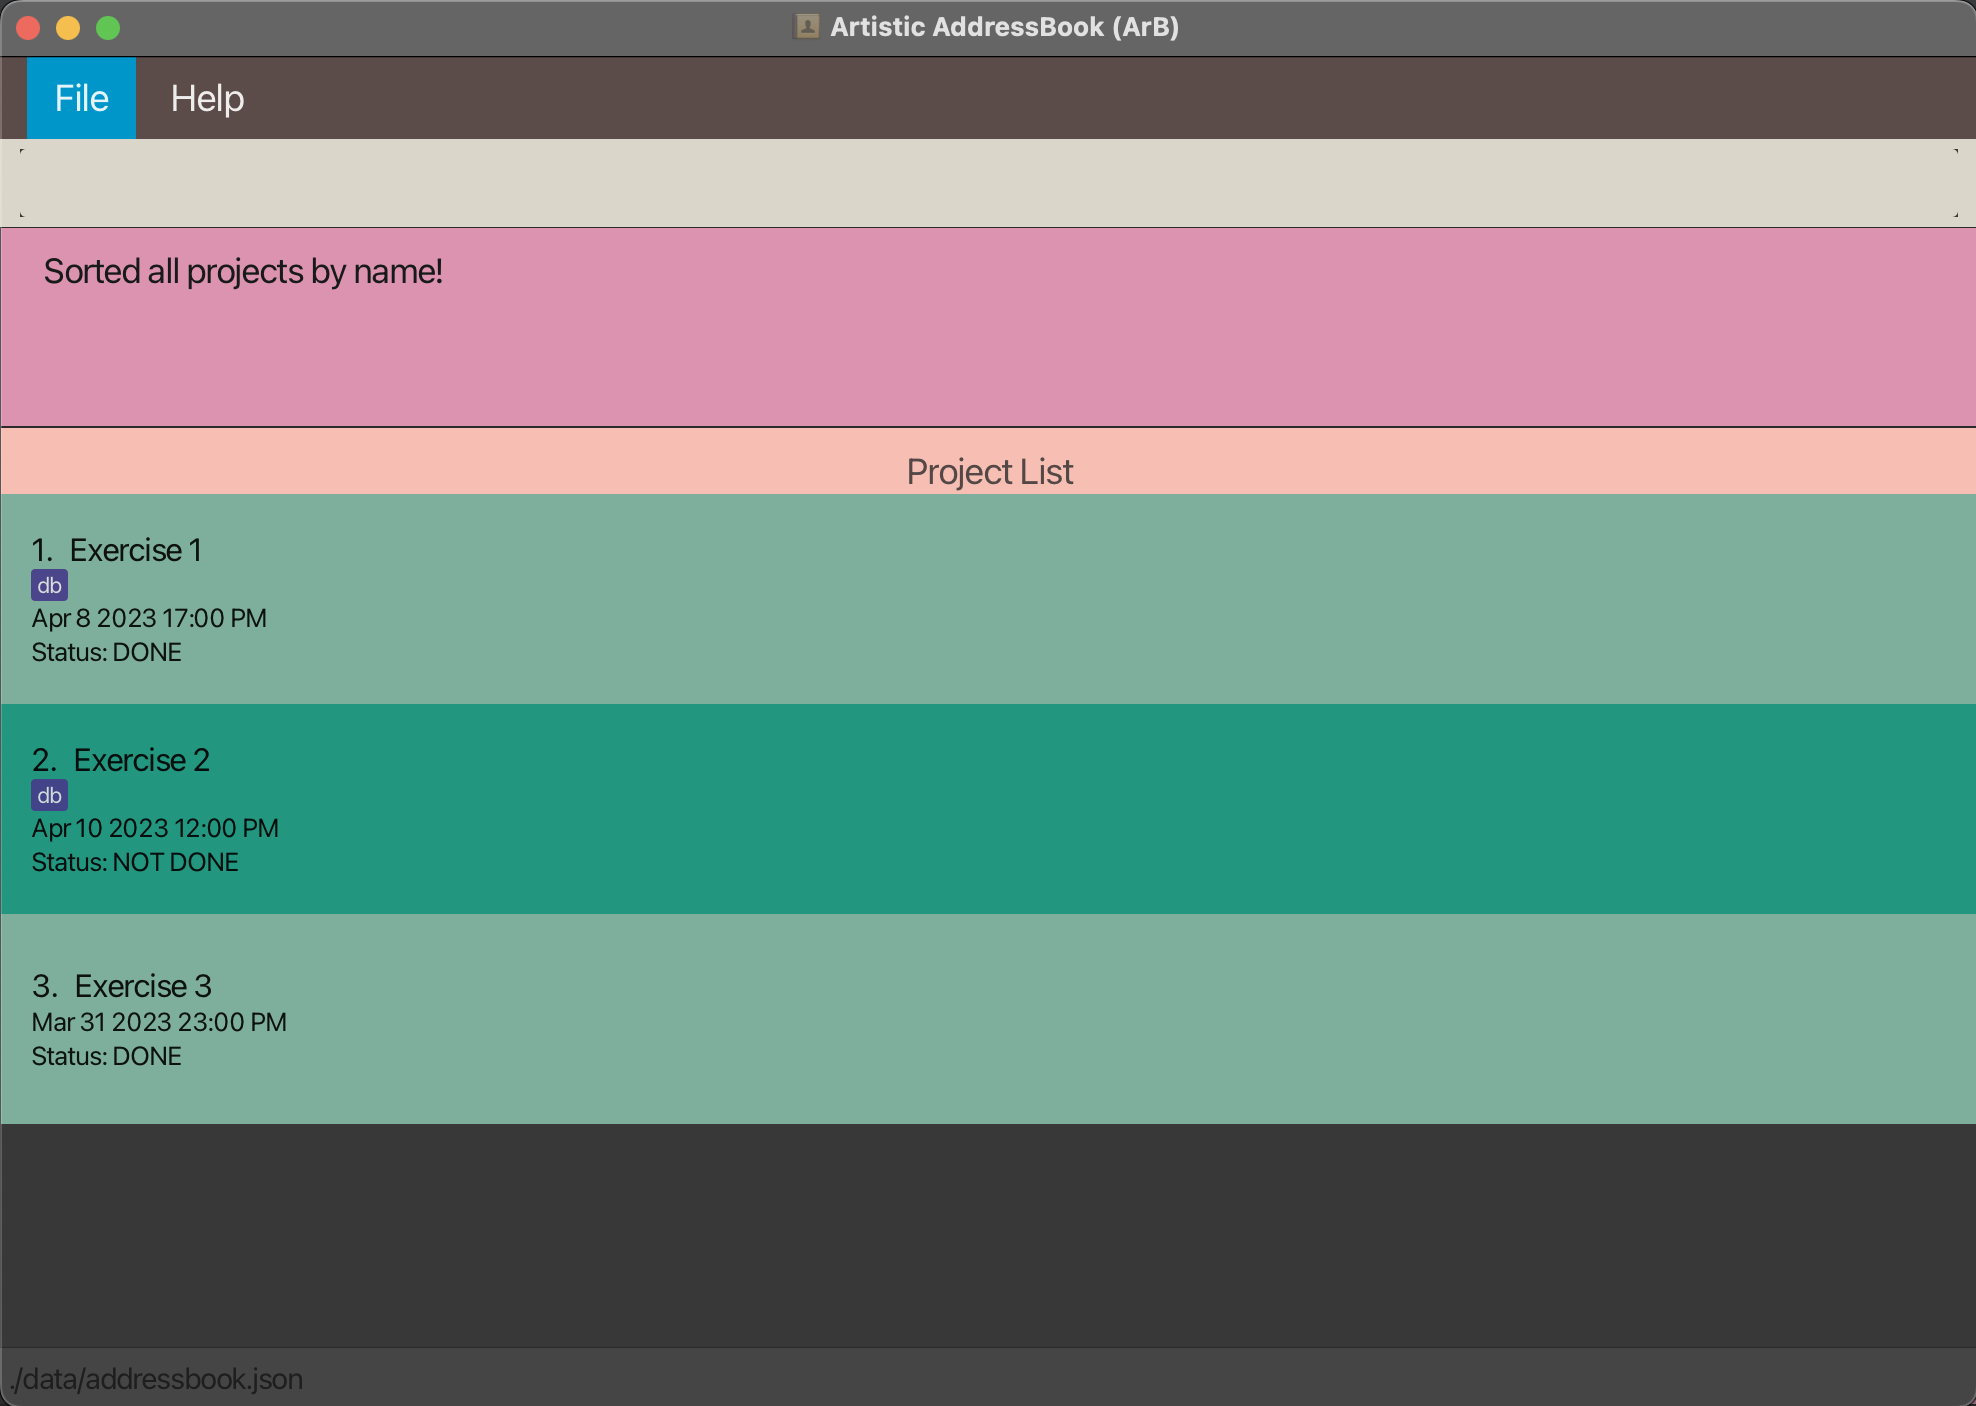
Example:
Original List:
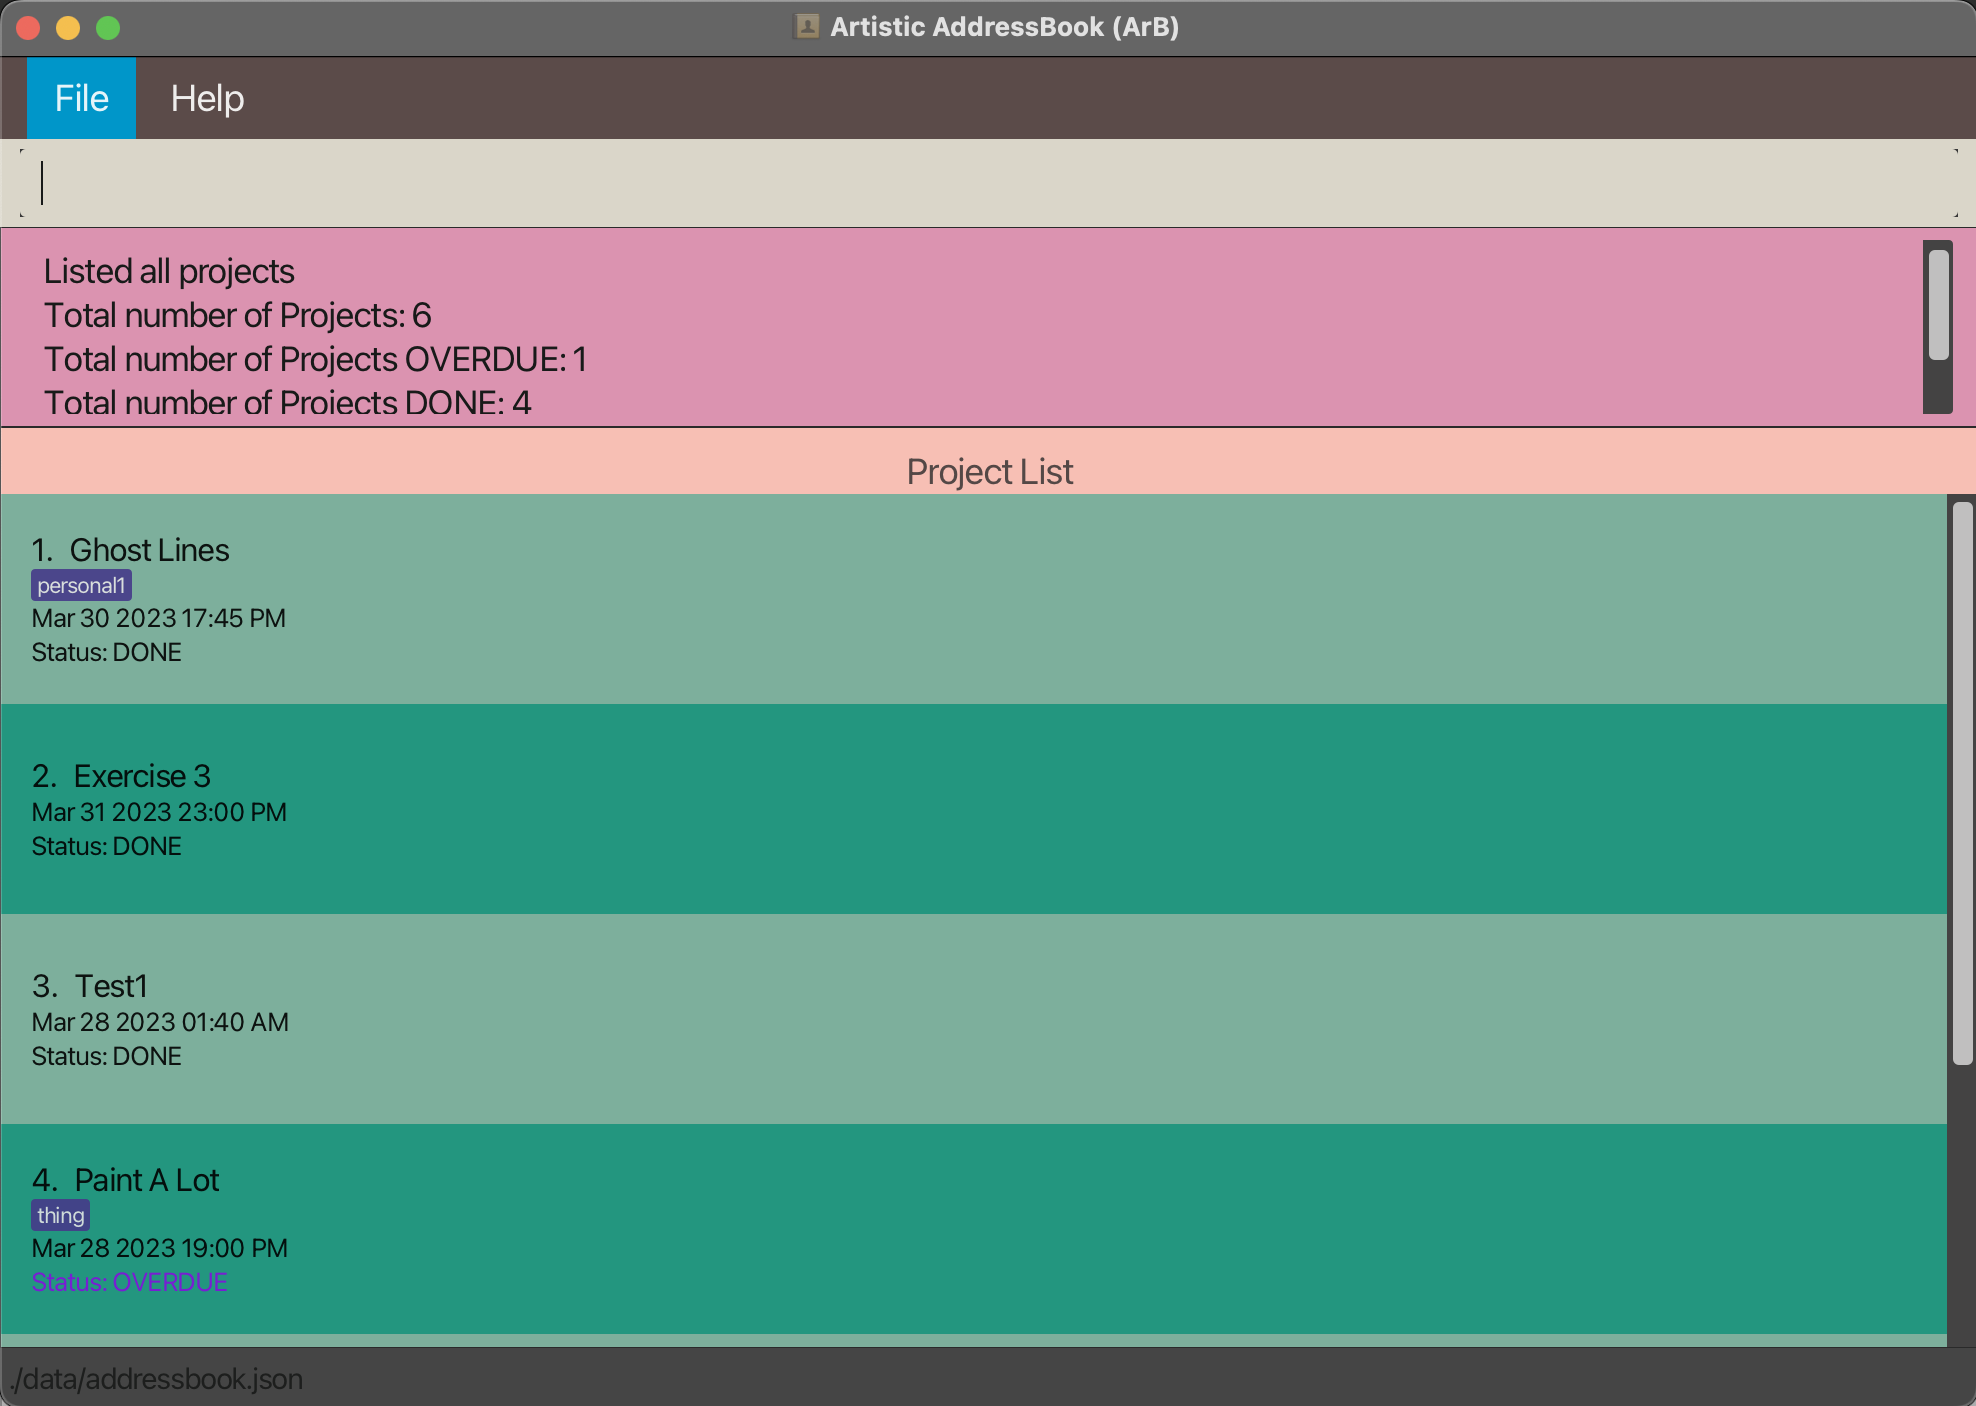
Run find-project name/exercise
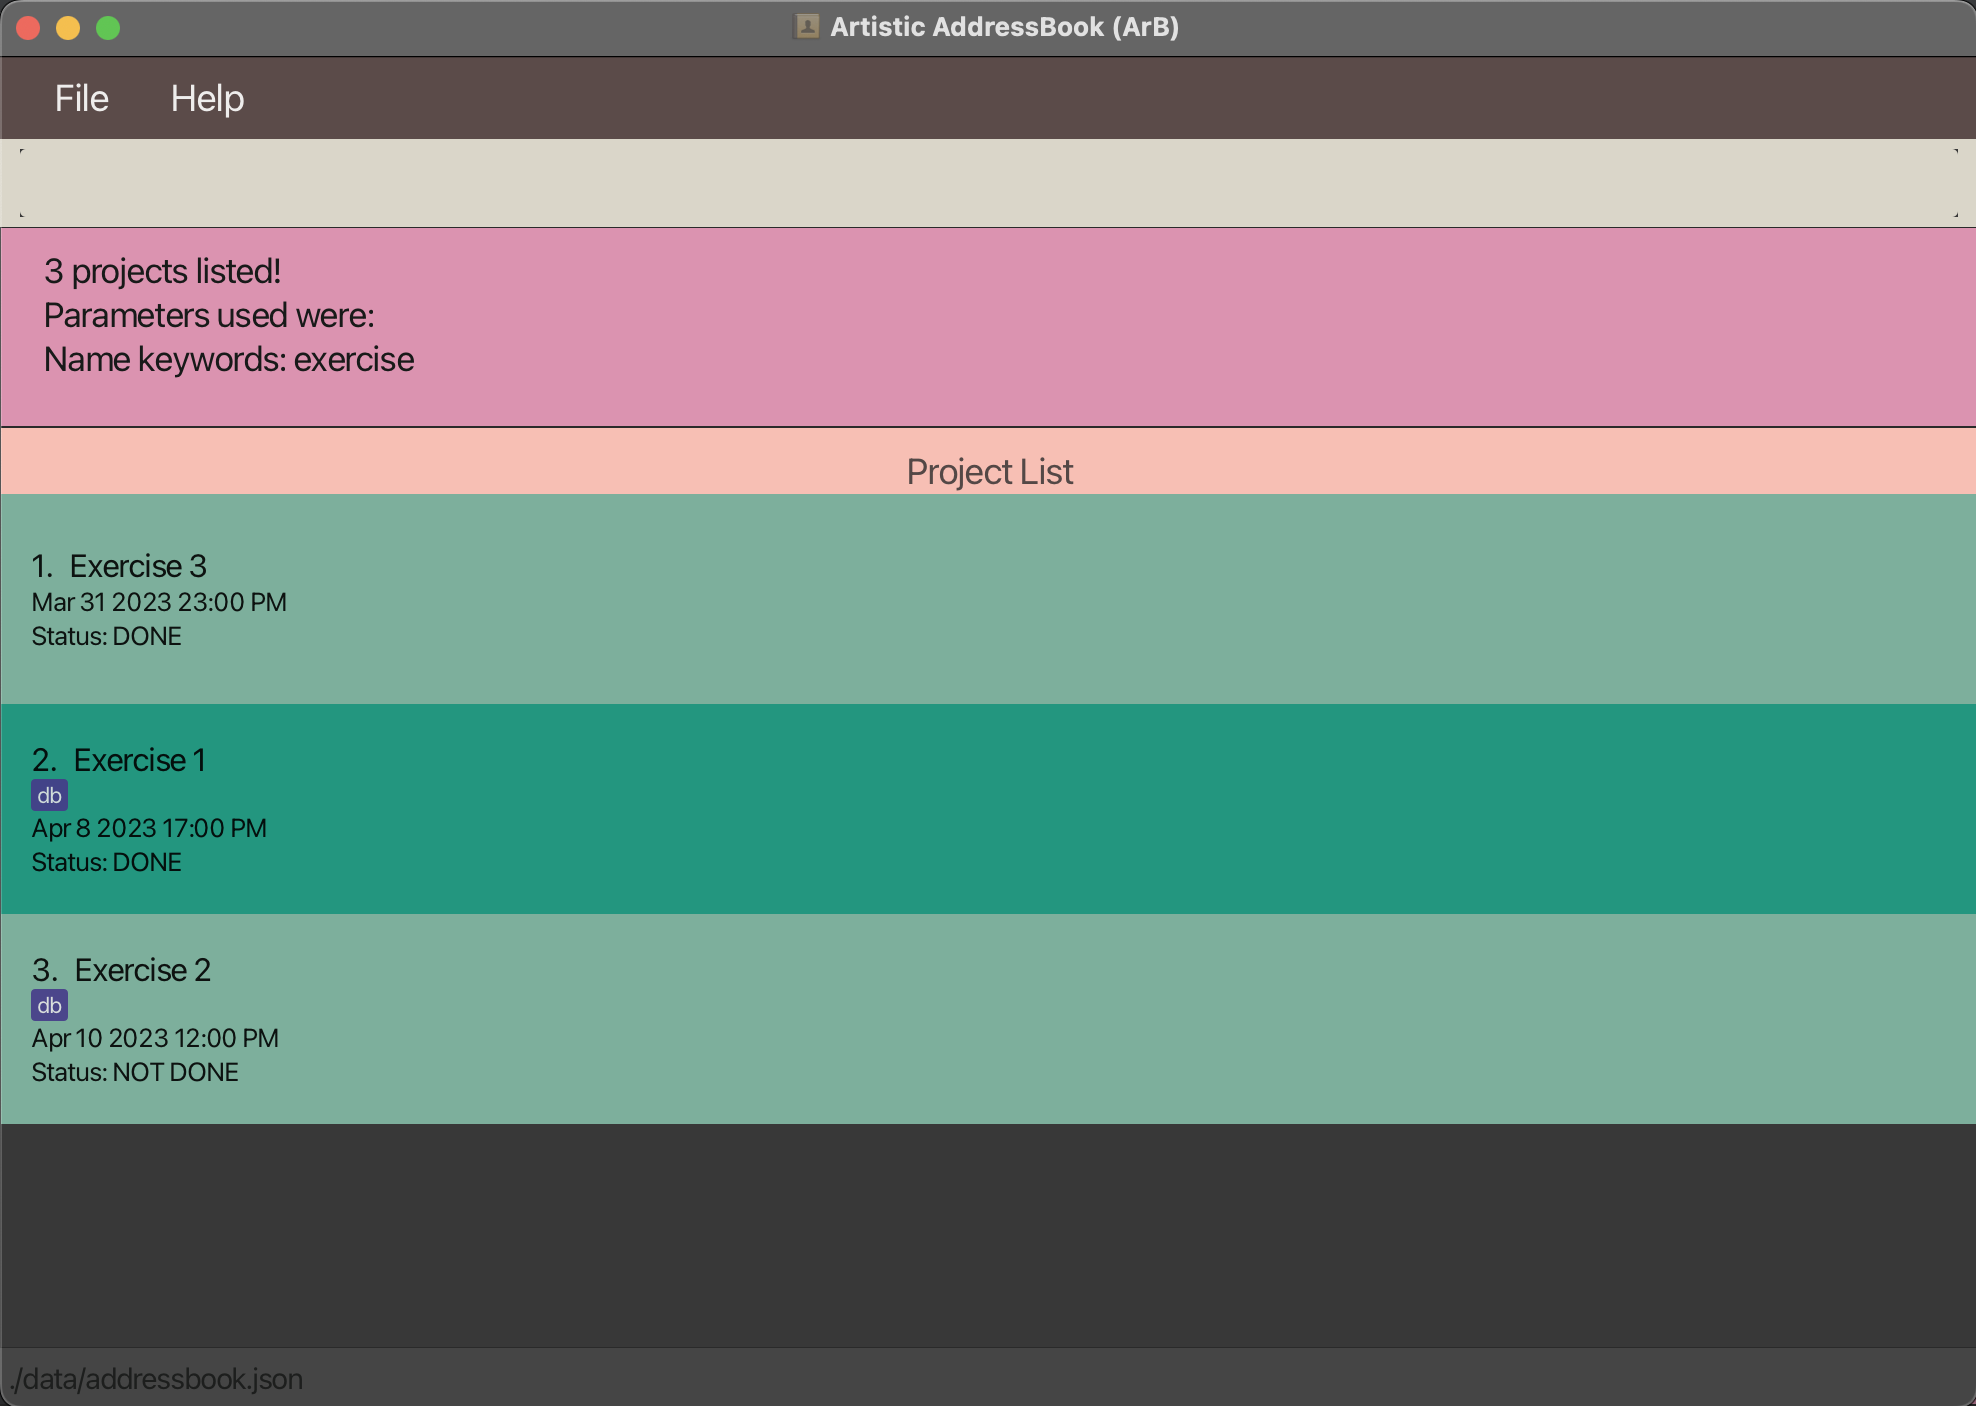
Run sort-project option/name
Linking a Project to a Client
This is only applicable if ArB has entered link mode, as instructed in the commands for adding a project or editing a project.
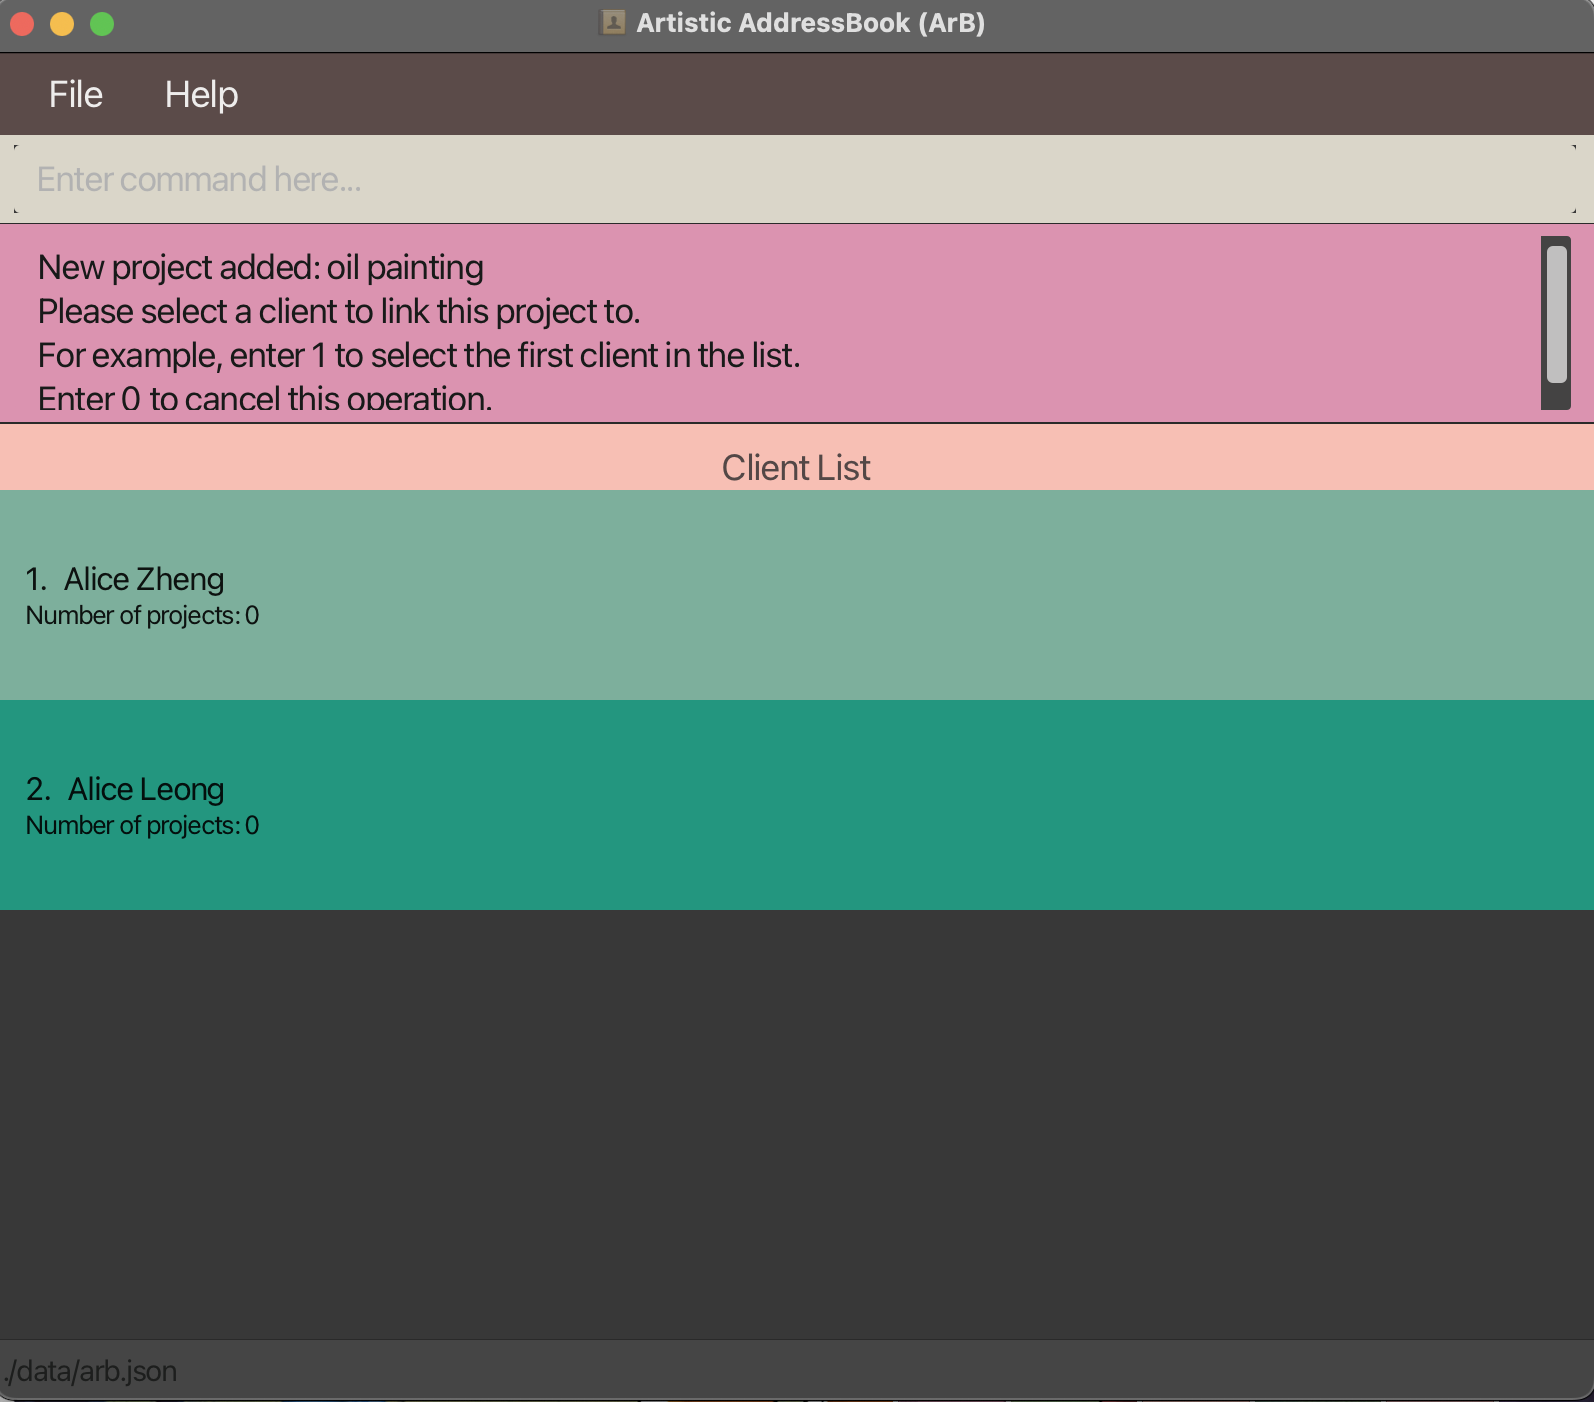
ArB will display a list of clients that match the
keywords you provided in your command.
For example, if add-project name/oil painting client/alice was entered, you might see something similar to the window below.
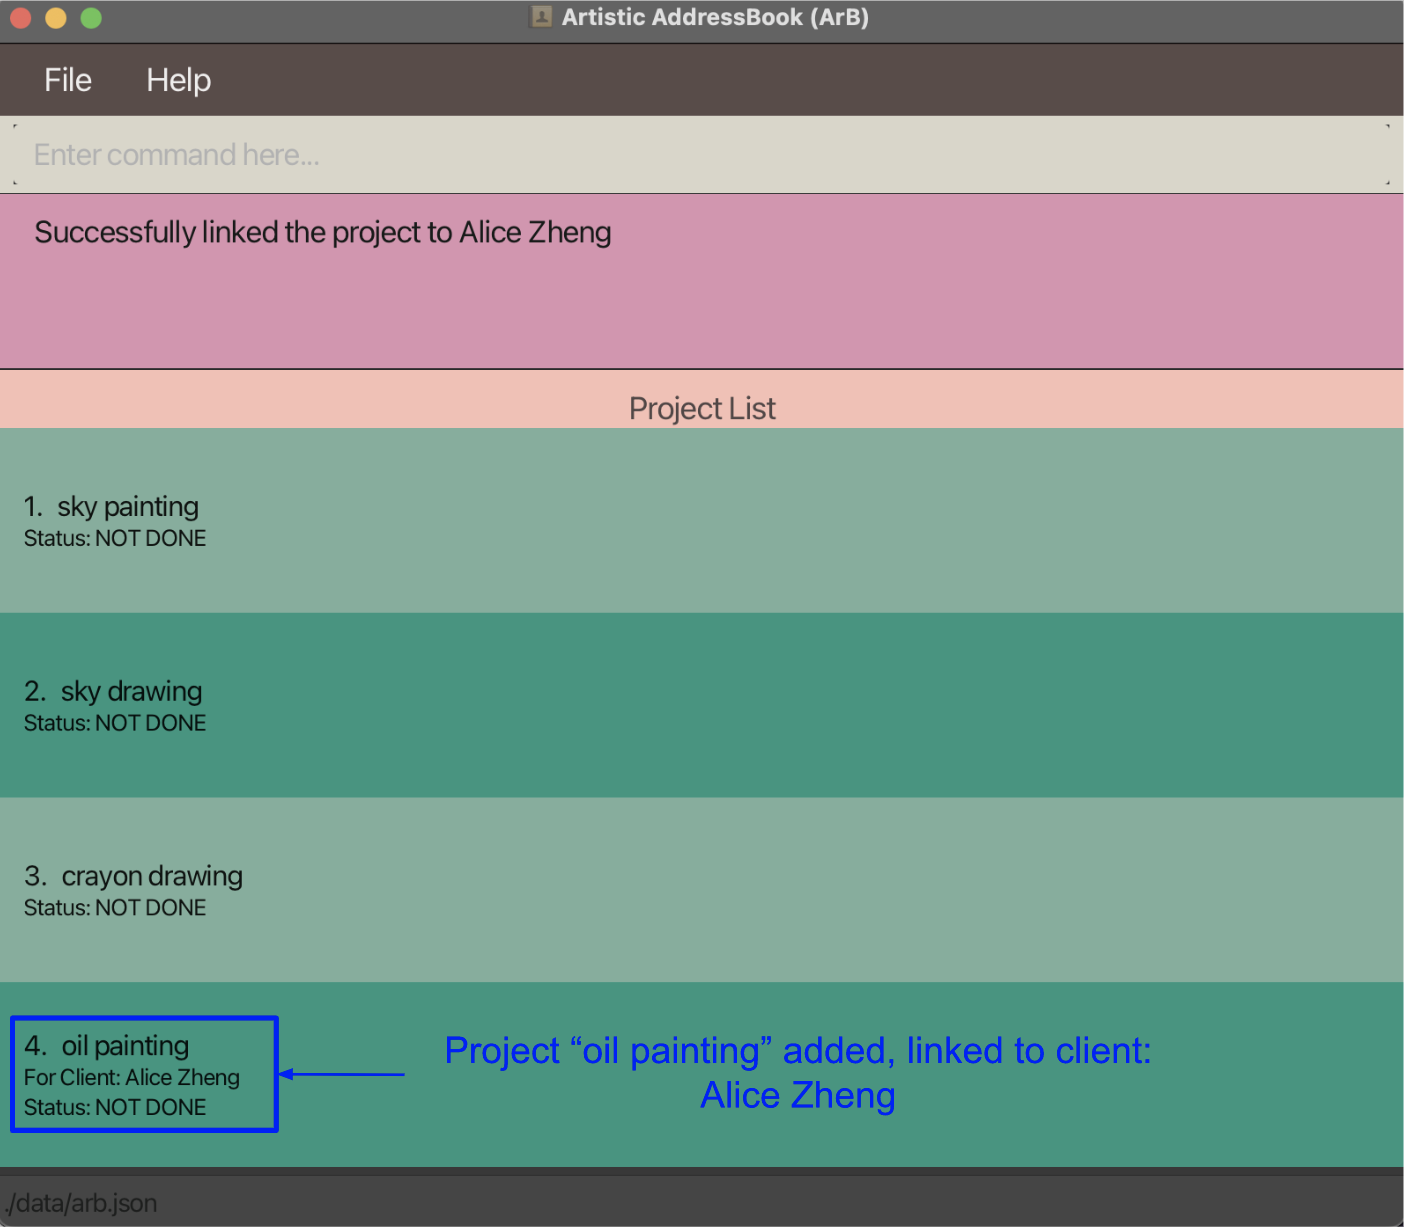
To choose a client in the displayed list to link to the project, you can enter an index.
Following from the previous example, if 1 was entered, the project oil painting will be linked to the client Alice Zheng, as shown in the image below.
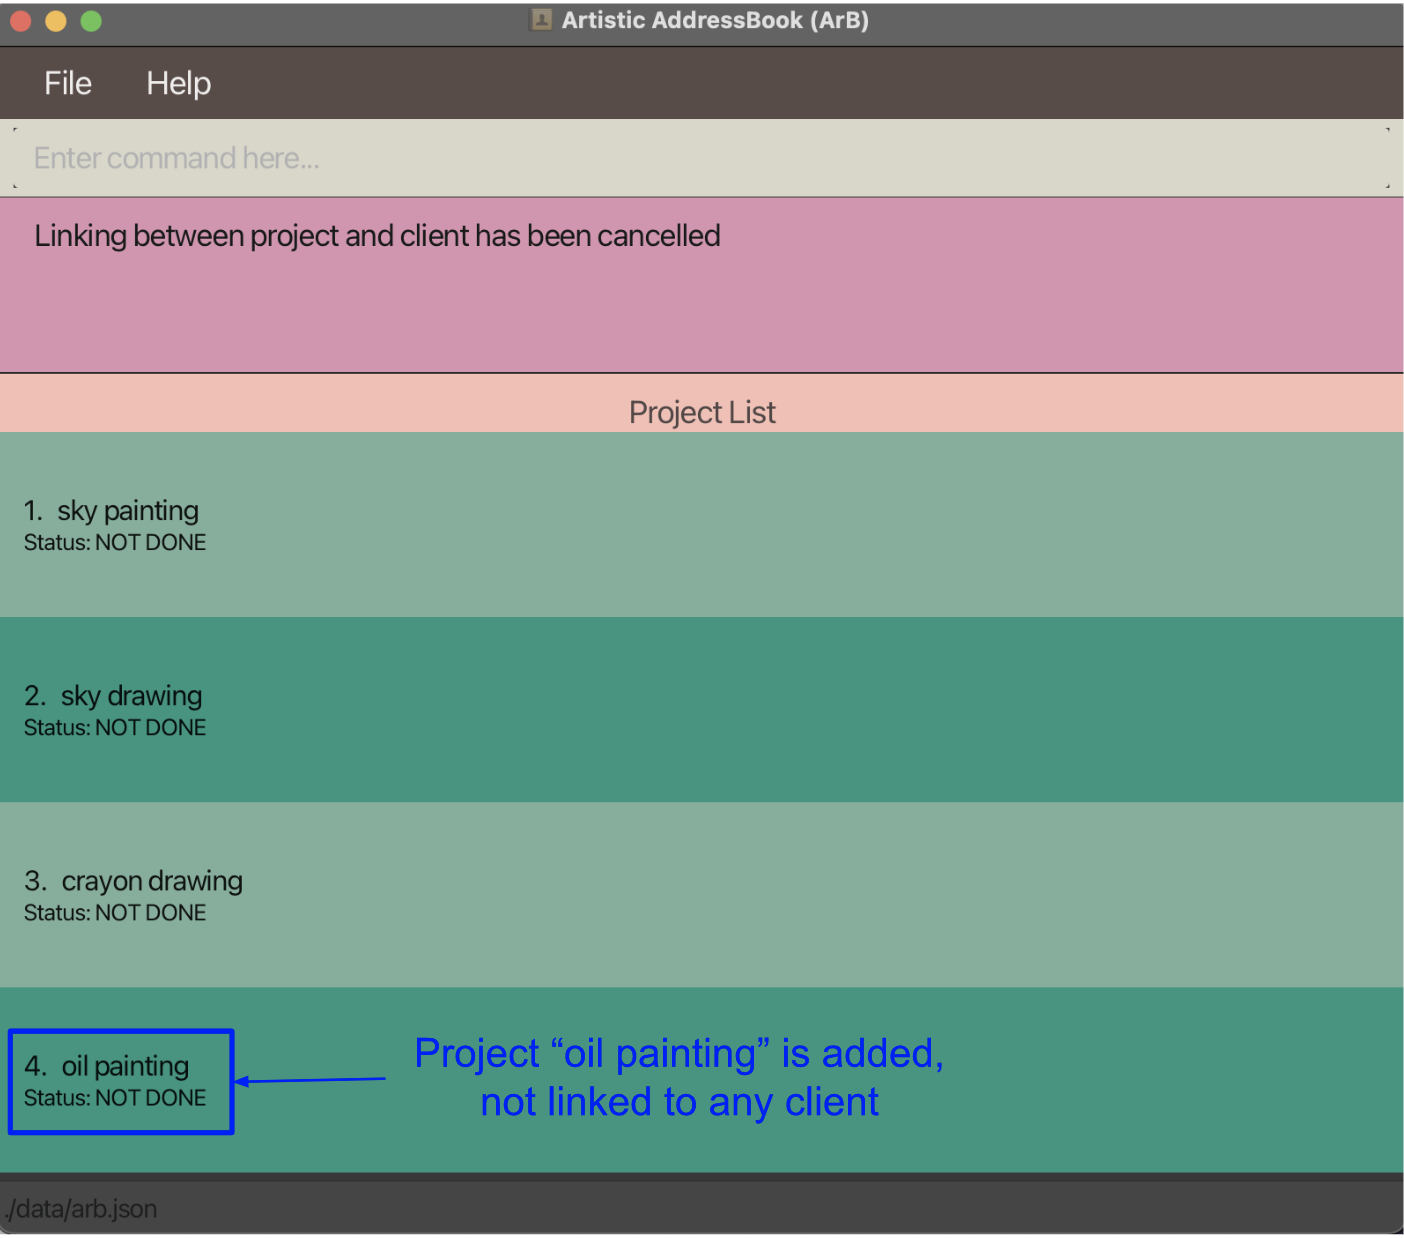
Entering 0 will cancel the linking operation, but the previously added or edited project will remain.
Following from the previous example, if 0 was entered, the project oil painting will still be created, but it will not be linked to any client, as shown in the image below.
Examples:
-
1links the 1st client in the shown list of clients. -
0cancels the linking operation and returns to the project list.
Tag commands
Listing all tags
Format: list-tag
Short form: lt
Lists all tags that exist in the ArB and shows the tag list. These include tags added to both clients and projects. The list shows how many clients and how many projects a particular tag is used with.
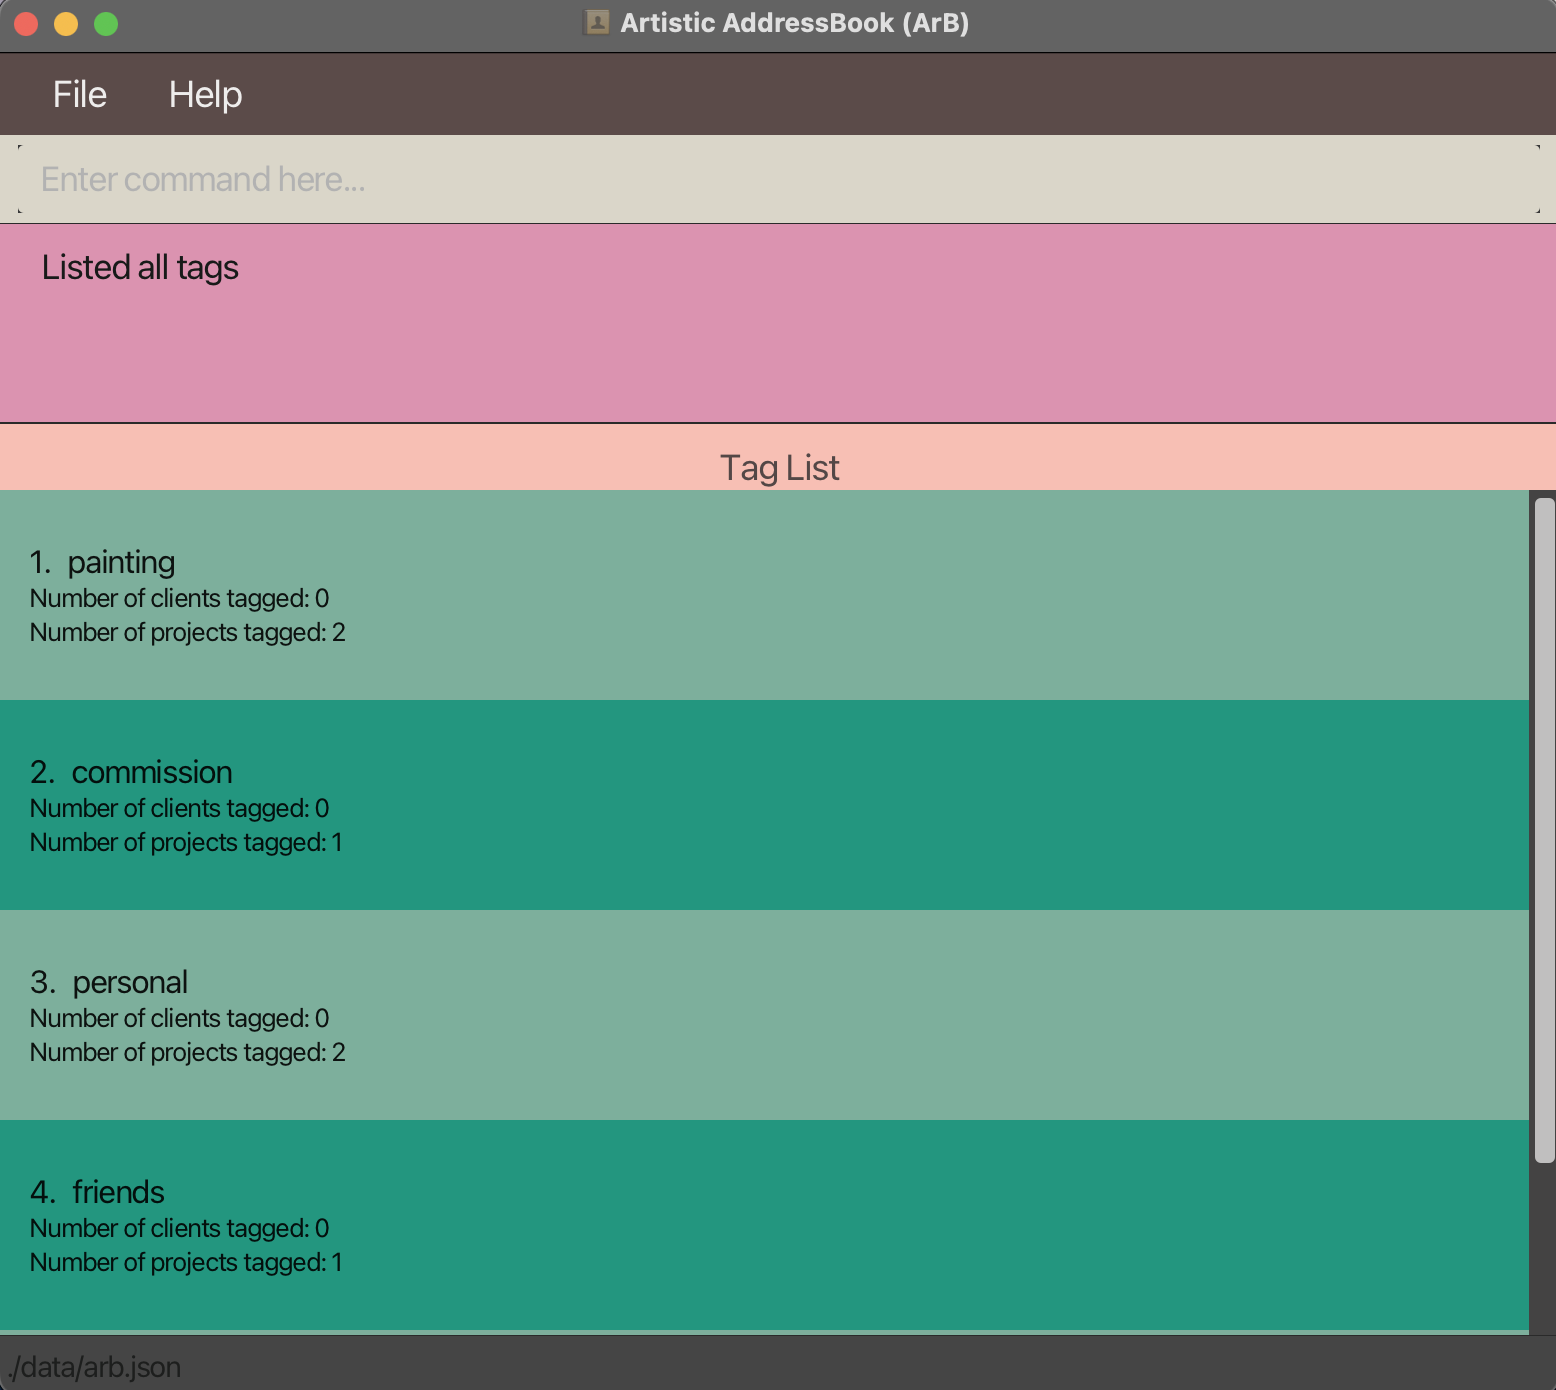
General commands
Viewing help
Format: help
Shows a message explaining how to access the help page (this guide).

Exiting the program
Format: exit
Exits the program.
Saving the data
ArB’s data is saved in the hard disk automatically after any command that changes the data. There is no need to save manually.
Editing the data file
ArB’s data is saved as a JSON file named arb.json, found in a folder named data, as shown in the image below.

Advanced users are welcome to update data directly by editing the JSON file.
FAQ
Q: How do I transfer my data to another Computer?
A: Install the application in the other computer and overwrite the empty JSON file it creates with the JSON file that contains your previous data.
Q: I can’t seem to find what I want using the find commands. What can I do?
A: Here are some tips for when you can’t find what you’re looking for:
- If too many results are shown, you can provide more parameters to narrow down the search scope.
- If what you’re looking for is not among the results shown, you can provide fewer parameters to broaden the search scope.
Q: Which parts of the app are case-sensitive?
A: In a command, the prefixes are case-sensitive and need to be in lower case. The command word is not.
In the details provided for a command, only the names of clients and projects are case-sensitive.
Q: How do I edit the data stored in the JSON file directly?
A: You can open up the JSON file found in ./data/ in any text or code editor and follow the existing pattern to input your own data. If the file does not contain any data, you can delete the file to get back the default samples.
Q: I don’t see all the clients/projects when running the sort commands. Why is this?
A: The sort commands are designed to only sort the items that are currently visible. If you have narrowed down the visible list by running a find command, it will only sort those items.
Q: Why doesn’t the app recognise the price I’ve entered as a valid amount?
A: If you see an error saying that a valid price needs to be entered even though you have already done so, it may be that the format is incorrect. The app only accepts positive price values to either 0 or 2 decimal places.